Showing posts with label recipe. Show all posts

Menu Plan Monday: December 18


Well it's the week before Christmas, where I will be hosting and cooking Christmas dinner, and I have not yet planned what I will be making! I'm leaning towards beef tenderloin, with a scape pesto and scalloped potatoes, but only if I can find beef tenderloin for less than $17 a pound!

In the meantime, this makes me motivated to have a simple menu for the week leading up to Christmas. While the temptation is there to have some form of take out each night of the week, Christmas is already hard enough as it is on my grocery budget, and home cooking is usually much less expensive. Especially since most of what I am planning to make this week is already in my freezer.

Here we go....

Chicken, broccoli and cheese braid
Pulled pork with coleslaw (is there anything easier than throwing a pork roast in a slow cooker and then pulling it with bbq sauce later?)
Fried chicken with salad
Pasta night - you choose your sauce
Breakfast for dinner

And that's the plan I'm submitting for Menu Plan Monday.


CSA Week Three


Week Three gave us our first beans of the season, as well as our first carrots. I'd have loved more beans and my children would have loved more carrots.

Here is what we got:

1 head Broccoli
I head Bok Choy
1 bunch Onions
1 bulb Garlic
1 bunch Carrots
1 bunch Hakurei Turnips
1 bunch Radishes
1 bunch Basil
1 Cucumber
1 lb Zucchini
1/3 lb Beans
1 bag Salad Mix


As soon as we got home, I prepped a bunch of the veggies for a veggie platter, which we had for dinner with some dip and other appetizer type munchies, picnic style. Sometimes you just need an indoor carpet picnic with a good tv show (we were watching Tour de France together.)


Despite my picnic and platter, I had lots of zucchini left to deal with, and a couple of reluctant eaters in my children, so I decided to try making zucchini chips with a bit of a crunchy coating on them.

It didn't work, they still didn't like zucchini.


They did, however, really like the lamb sliders I served with the chips.

Zucchini "Chips"

1-2 zucchini, sliced in 1/4 inch coins
1-2 egg whites
1/2 cup panko bread crumbs
1/4 cup Parmesan cheese
pepper to taste


Preheat oven to 375F.

In a medium bowl, toss the zucchini with the egg whites, being sure to coat everything well.

In a separate bowl, mix the bread crumbs, cheese and pepper. Toss the coated zucchini in the mixture, then spread on a single layer on a baking sheet.

Bake for 10-15 minutes, until golden and crispy.

Best served warm.


Mixing up a salad


How much easier can you get with a salad that involves greens, corn, tomatoes and chunks of sausage? Sure, the recipe calls for grilling corn on the cobb, which is not in season yet, but is easily substituted for frozen corn. It also calls for making a dressing, another step I skipped, using bottled dressing instead. Oh, and I didn't slice my cherry tomatoes thin - I used grape tomatoes which were great as is (and made it easier for the kids to pick around so they didn't have to eat a "yucky" tomato.)


If I had actually followed every step of the recipe, this still would have taken very little time to make. It was such a nice change for a salad, a great new way to enjoy sausage, and yet still a good, filling dinner. I will make this again. Maybe with fresh corn, when it becomes available.

(Btw, how are the pictures? These were taken with my cell phone and I'm pretty pleased with how well they turned out.)


Sausage and Corn Salad

4 cobs of corn
3 tbsp white-wine vinegar
2 garlic cloves, minced
1/4 tsp cayenne
1/8 tsp salt
3 tbsp olive oil
1/3 cup finely chopped cilantro
4-5 hot italian sausages, about 500g
8 cups mixed salad greens
500 g cherry tomatoes, thinly sliced

Preheat barbecue to medium-high. Peel back corn husks but do not remove from cobs. Peel off and discard silk. Re-cover corn with husks. Soak cobs in water for 5 min.

Meanwhile, stir vinegar with garlic, cayenne and salt in a medium bowl. Whisk in oil. Stir in cilantro.

Oil grill. Barbecue sausages and corn. Turn sausages occasionally until cooked through, 10 to 12 min. Turn corn frequently until tender, at least 8 min. Spray any flare-ups with water if necessary. When cool enough to handle, remove and peel back husk, then, using a knife, shave corn from cob. Thickly slice sausages.

Divide greens, corn, sausage and tomatoes between plates. Drizzle with dressing.

Martha Stewart isn't all bad


I've never been a huge fan of Martha Stewart, and admit, I'm still not. But I recently had her Martha's Everyday Food app for the iphone recommended to me by someone who knows food, so decided to give it a try.

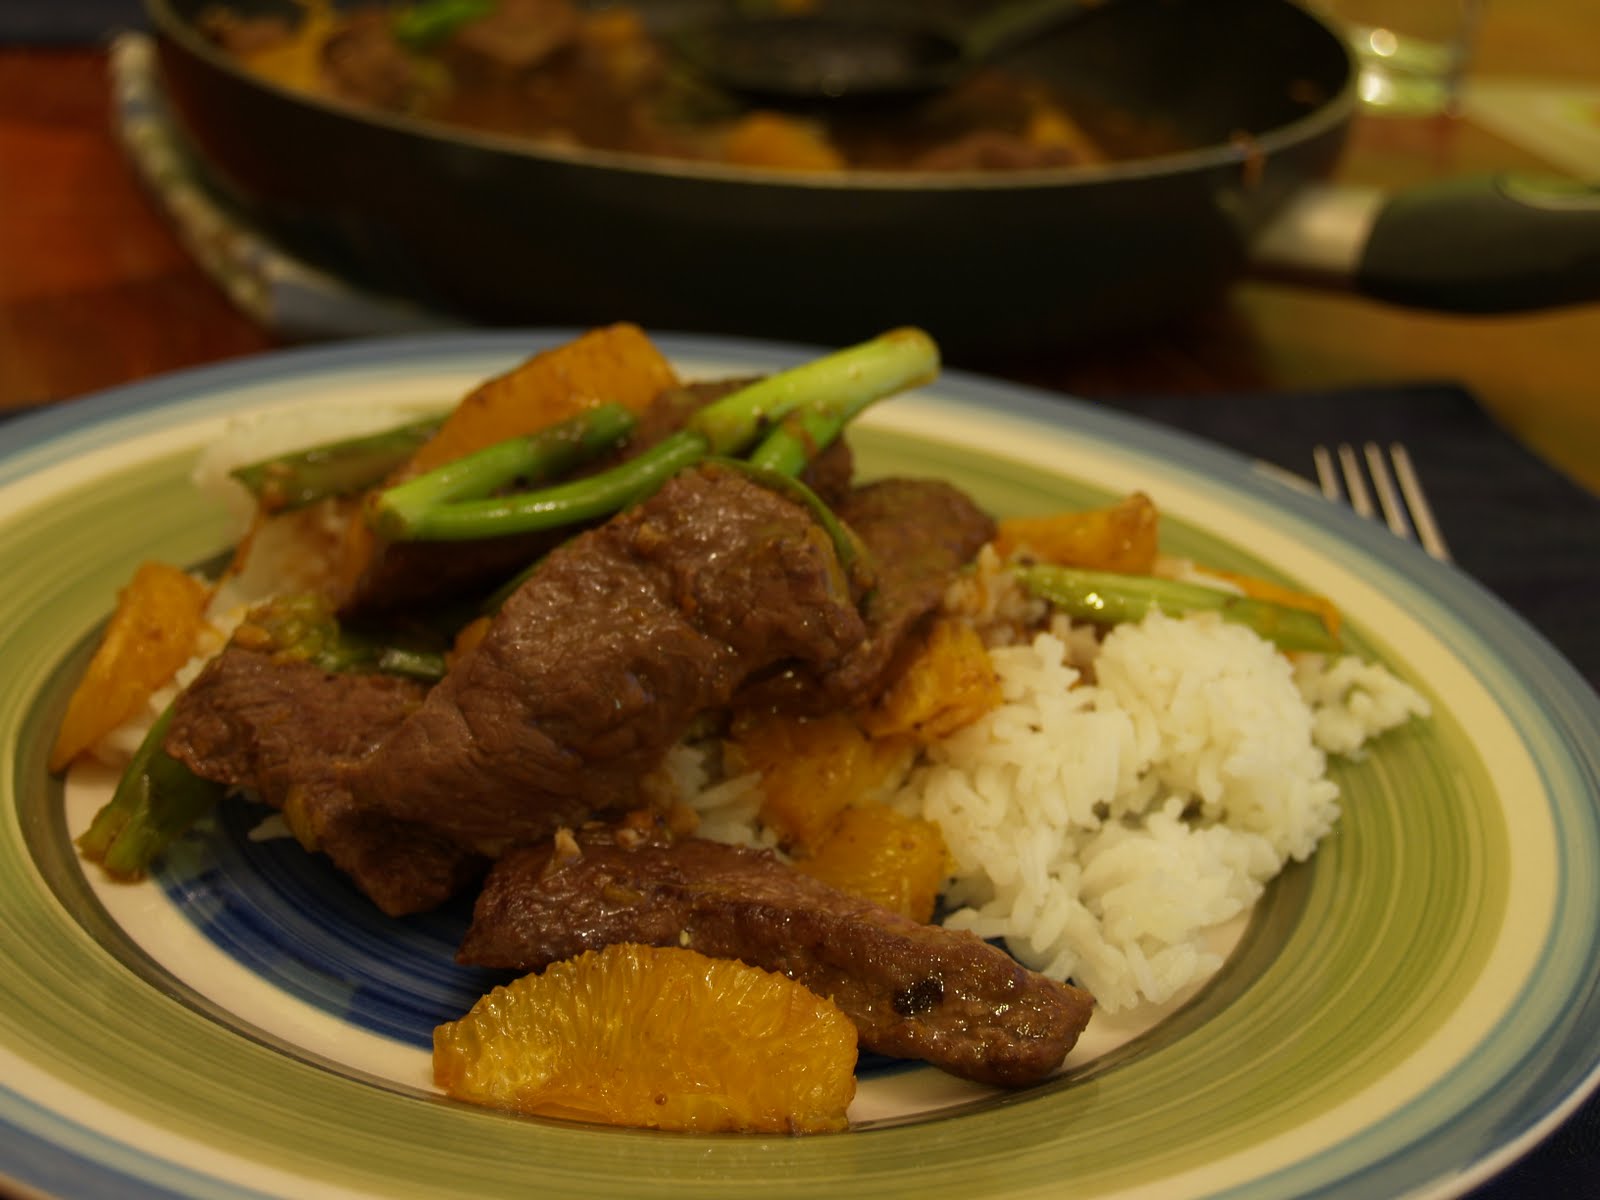
This Beef and Orange Stir-Fry is the first recipe I've tried from it, since we seem to be enjoying having stir-fry for dinner since the weather warmed up, and everyone in this house has been eating a good amount of oranges lately.

Right off the top, there is not enough oranges or sauce. Before I even got this on the table, I added in more orange segments. And still ran out.


Aside from needing more sauce and oranges, however, this was quite good. There was barely enough left for the hubby's lunch the next day, none at all for mine, and was given thumbs up by everyone.

I admit, I've been enjoying the shopping list feature of this app, including how it links back to the recipe you need the item for. As for recipes, I'm still working my way through a few of them and holding out judgement until I've done a really thorough testing, even though I will make this again.

Beef and Orange Stir-Fry

  • 3 oranges (I used 1 more and could have easily used 2-3 more)
  • 2 cloves garlic, minced
  • 2 tablespoons soy sauce
  • 1 1/2 pounds trimmed boneless sirloin or rib eye, cut into 1/2-inch-thick strips
  • 1 tablespoon cornstarch
  • 1 to 2 tablespoons canola oil
  • 6 scallions, green parts only, cut into 1-inch lengths

  • Into a small bowl, finely grate zest and squeeze juice from 1 orange. Add garlic and soy sauce.
  • With a sharp paring knife, peel remaining 2 oranges. Slice oranges crosswise 1/2 inch thick, then halve slices; push out and discard any seeds. Set aside.
  • In a medium bowl, toss meat with cornstarch until coated. Heat 1 tablespoon oil in a large nonstick skillet over high heat. Working in batches (adding more oil if needed), brown beef on all sides, 3 to 5 minutes; transfer to a plate.
  • Pour juice mixture into skillet, and boil until syrupy, about 1 minute. Return beef to skillet; add orange slices and scallions. Toss until coated and heated through. Serve hot.

Cooking out of town


I learned something last week: My grandparents oven is broken.

They didn't know it.

And I wish I'd known it before I started dinner, since they have a perfectly good convection oven on the counter beside the oven.

It was really a shame, because the dinner I was making included this lovely chicken, glazed with a peach-bourbon glaze, would have been so tasty otherwise.

The big tip off for me should have been when the pie crusts for the banana cream pie I was going to make did not seem to get golden and beautiful. Guess I didn't notice.

What really clued us in, however, was the little sparks popping out of the oven, and when you looked inside and saw tiny little flames on the little orange spots on the burner, while the rest of the burner stayed a dull grey. That and raw chicken after 1 1/2 hours of baking.


Over at my mother's house, the oven worked just fine. I had left over pie dough, and managed to throw together a blueberry pie for my "little" brother.


Do you think he liked it (aside from his offer to pay me to make him a bunch of blueberry pies he could freeze for later?)

Blueberry Pie

1 recipe for double crusted pie dough
1 bag of frozen blueberries, not defrosted (about 4 cups)
2 tbsp corn starch
1/4 cup sugar
1 tsp lemon juice

Mix the blueberries with the cornstarch, sugar and lemon juice. Pour into bottom pie shell, cover and crimp as you like, being sure to cut a hole for venting steam.

Bake at 400F, on a tray, for 20 minutes, then reduce the heat to 350F and continue to bake for 45-55 minutes, until golden on top, and bubbling a bit. Keep an eye out that you do not burn the crust.

Serve with vanilla ice cream, warm or at room temperature.


I Heart Cooking Clubs - Mark Bittman Edition: Potluck for supper


My favorite theme for I Heart Cooking Clubs is Potluck. Where we get to do what we want, from anything.

Not that the themes are very restrictive, far from it! But just saying Potluck brings images of variety and surprise. You never know exactly what you are going to get at a Potluck (except maybe for potato salad - doesn't someone always bring potato salad?)


I went very simple for my selection this week. I started by doing a search for Mark Bittman recipes online that involved chicken thighs. Found a couple of interesting ones that I haven't tried yet, and also found one on his own site for chicken parts.

Roast chicken parts with Olive oil or butter, with a bunch of variations. I went with olive oil and butter, used the thighs I had on hand, and added a full head of garlic, from one of the suggested "ideas."


Pretty good, actually. I had 3 boys eating dinner with me that night, all under 11, and all 3 of them enjoyed it and complimented me on it. My oldest is currently obsessed with chicken caesar salad, so he was thrilled to rip his chicken apart and mix it into his salad, the more garlic the better, while my youngest ate his chicken without running to the fridge for the Ranch dressing (something that rarely happens - that child will eat almost anything if you give him Ranch dressing, but isn't picky, since he asks for sushi for breakfast.)

I have to admit - I've really enjoyed being able to be back in the kitchen, even if just to make something as simple as roast chicken thighs with oodles of garlic.

So? Did anyone bring any potato salad?

Roast chicken thighs with olive oil or butter

1/4 cup extra virgin olive oil or butter
1 whole chicken, 3 to 4 pounds, trimmed of excess fat and cut into 8 pieces, or any combination of parts (I used 9 chicken thighs)
Salt and freshly ground black pepper
Several cloves of garlic (20 wouldn't be too many) (I used an entire head)

Heat the oven to 450°F. Put the oil or butter in a roasting pan and put it in the oven for a couple of minutes, until the oil is hot or the butter melts. Add the chicken and turn it a couple of times in the fat, leaving it skin side up. Sprinkle with salt and pepper , add the garlic, and return the pan to the oven.

After the chicken has cooked for 15 minutes, and turn the pieces. Roast for another 10 minutes.

Turn the chicken over (now skin side up again), and cook until the chicken is done (you’ll see clear juices if you make a small cut in the meat near the bone), a total of 30 to 40 minutes at most. Skim excess fat from the pan juices if necessary; serve, with some of the juices spooned over it.

I Hearts Cooking Clubs - Mark Bittman Edition: Bacon and Girlfriends


I've been a bit remiss lately, not in cooking, but in remembering to take the pictures off my camera and put them onto my computer! I admit, I'm still learning iPhoto, and not figuring out how when I edit a picture there, how I can get it to save to my library of photos, the ones I would upload to here. Or figure out how to upload a photo from iPhoto to here. (And if you know how and can explain it to me, no small task, I'd welcome your advice!)


I'm making up for my I Heart Cooking Club delinquency by combining two weeks themes into one recipe, but it is a really good recipe, one good for both the bacon week and the girls night in week. I found this recipe, Spinach, Bacon and Sweet Potato Salad, doing a search for Mark Bittman recipes involving bacon. It had everything I wanted in it, and is probably the best Mark Bittman recipe I've ever had.

My children, as can be expected, gave it thumbs down. The Hubby and I both gave it thumbs up and will likely have this again sometime.


From the October 2009 issue of Runner's World

2 sweet potatoes, peeled, cut into pieces
1/4 cup olive oil
Salt and freshly ground black pepper
2 thick slices of bacon (
I used 3 slices of double smoked bacon, thick, diced)
1 red bell pepper, cored and chopped
1 small red onion, halved and thinly sliced
1 tablespoon fresh ginger, peeled and minced
1 teaspoon ground cumin
Juice from 1 orange
1 pound fresh spinach

Preheat the oven to 400°F. Put potatoes on a baking sheet, drizzle with two tablespoons of the oil, sprinkle with salt and pepper; toss to coat. Roast, turning occasionally, until crisp and brown outside and tender inside, about 30 minutes. Remove and keep on the pan until ready to use. While potatoes cook, put bacon in a stainless steel or other nonreactive skillet and turn heat to medium. Cook, turning once or twice, until crisp. Drain on paper towels and pour off fat, leaving darkened bits in the pan. Put back on medium heat; add remaining oil to the pan. When hot, add bell pepper, onion, and ginger to the pan. Cook, stirring once or twice until just softened, about five minutes; stir in cumin and bacon (broken into pieces). Stir in orange juice and turn off heat. (The recipe can be made up to an hour or so ahead to this point. Gently warm dressing again before proceeding.) Put spinach in a bowl large enough to comfortably toss the salad. Add the potatoes and warm dressing. Toss to combine. Serves four.

Happy Easter!


We aren't home for Easter this year, but just because we aren't, doesn't mean I can't find a stove and get cooking!

While the Easter Bunny had to go traveling to find the kids (leaving chocolate eggs in very odd places), I brought some items from home to make things festive for the grown ups. Including these fun eggs that I turned into Deviled Eggs, as part of the ham dinner I made.

Despite the colors, these eggs are completely edible. And are very easy to make.


Easter Eggs for Grown Ups


hard boiled eggs (as many as you'd like, I made 8), still in the shell
various food coloring gels (the kind you use to color icing for cakes)
zip top bags, one for each color you are going to use.

Prepare the colors: Place 1/2-2/3 of a cup of warm water in each of the zip bags you are going to use*. Using separate spoons, mix in some of the food coloring, swirling around in the water so that all the color mixes in and comes off the spoon. The amount of color you use depends on how vibrant you want the eggs to be.

*Tip* Place the zip bags in a bowl, mug or plastic container to let it stand up, before you add the water.

Crack the shells of the eggs, but do not remove! You want to create good cracks so the color can seep inside, but not leave holes in the shells.

Place the eggs inside the colored water bags, seal the bags, removing the air as you do so, then place the bags in the fridge over night.

The next day, drain the water and peel the eggs to reveal the colors and patterns you created.

Use your fun colored eggs for Deviled Eggs, egg salad sandwiches, sliced on a salad, pretty well anywhere you would normally use a hard boiled egg.

Happy Valentine's Day


I woke up to find this on my car earlier this week, left for me by my hubby. What a lovely way to start the day.

Valentine's Day is a commercial holiday more than a romantic holiday. Buy, buy, buy, buy.....
Thanks but no thanks. I don't want over priced flowers that will wilt in only a few days. I don't like or wear jewelery, and between my two children, we have enough stuffed animals in this house already.

My hubby did not get a fancy valentine's gift his morning - I made him breakfast instead. And this afternoon we will spend some time together making dinner (instead of my banishing him from the kitchen while I cook). I'll probably make something fun and filled with calories for dessert as well. Then we will spend some time together, with our children. I believe the plan involves playing Beatles Rock Band.


This week my children's school held a bake sale, with the proceeds going to Make a Wish. My boys brought in this fudge, cut out into heart shapes with a cookie cutter. My oldest tells me it was one of the first things to sell out, and that his silly brother bought a piece as one of his choices, despite the pieces at home in the fridge.

Ridiculously easy to make, perfect for making late at night when you get a last minute request to submit something for the bake sale the next day.

Valentine's Day Fudge


3 cups chocolate, chopped up (I used milk chocolate for this, but you can use semi-sweet as well)
1 can sweetened condensed milk
dash of salt
1 teaspoon vanilla extract (or use mint or raspberry or orange extract instead)

Any add in's you'd like, such as white chocolate chunks, nuts, marshmallows....

Line a 9x9 inch pan with parchment paper.

In a heavy pot, over low heat, melt the chocolate, condensed milk and salt, stirring constantly.
When everything is melted together, and smooth, remove from heat and add in the vanilla, plus any additions you want to make.

Spread into prepared pan, smoothing the top as best you can.

Chill for at least two hours.

Turn out fudge and parchment paper onto a cutting board. Peel away the paper and cut into desired shapes using a knife or cookie cutters.

Leftovers should be kept in the fridge (but really, who are we kidding about leftovers?)

Happy Birthday Mom


My mother's birthday is within days of Christmas. Not the best time of the year to have a birthday, being so close to a holiday.

For years my Grandparents made sure my mother always had a good birthday, and that she always received at least one gift, along with having a special dinner.

This year, however, they aren't well, and I knew that if I didn't do something, my mother would not get her traditional dinner of Hawaiian spare ribs and rice.


Now it isn't my fault my mother chose to have prime rib instead of spare ribs. Can you blame her?


I did, however, make her the cake she has had for years: an angel food cake, layered, with a lightened custard, served with strawberries.

I've watched my grandmother make this cake for years, so I knew what to do, but still made a few modifications. My grandmother always bought the angel food cake, I made mine from scratch. My grandmother used Birds Eye Custard powder, lightened up with whipped heavy cream, I made a pastry cream, with lots of vanilla bean seeds in it, lightened up with whipped heavy cream.

My mother would have been happy if I'd have just given her the cream and a spoon.


It isn't fancy. Actually, when put together, it isn't even pretty. But it sure tastes good.

We had to cut our visit to my mother short (I'm sick as can be, still, and really not looking forward to trying to work tomorrow,) but at least we were there long enough to carry on some of the birthday tradition.

Custard Cake

1 angel food cake (store bought is fine, if you don't want to make your own), cut into three layers
1 recipe for custard, below, cooled
3/4 cup heavy cream
1/2 tsp vanilla
2 tsp sugar
Sliced fruit of your choice (my family has always used frozen strawberries, defrosted with a touch of sugar, as well as canned, sliced peaches in light syrup, though I admit I skipped that this year.)

Whip the heavy cream with the sugar and vanilla until it is light and fluffy, being careful not to over whip. Fold the cream into the custard, until well mixed.

Place the bottom layer of cake on a large platter, one that will contain the custard that will fall off the sides of the cake. Spoon 1/4 of the custard on top of the cake, spreading slightly. Repeat with the next two layers. Use the last 1/4 of the custard to try and "ice" the sides of the cake.

If there is any left over, place it in the middle hole of the angel food cake.

Or use your fingers to lick the bowl clean.

To serve, put a slice of cake on a plate or in a bowl, and top with your choice of fruit.

"Custard"
(I know, it's pastry cream, but my grandmother calls it her custard for her banana cream pies, and who am I to argue with her about it?)

1/4 cup corn starch
2/3 cup sugar
1/2 tsp salt
2 cups milk, scalded
3 slightly beaten egg yolks
2 tbsp butter
1/2 tsp vanilla (or the seeds of one vanilla bean)

Mix corn starch, sugar and salt together in a medium pot. Gradually add milk. Cook over medium low heat, stirring constantly, until all the sugar and cornstarch has been dissolved and the milk is hot.

Add a ladle full of hot milk into the eggs, whisking constantly to temper the eggs. Whisk the egg mixture back into the hot milk in the pot. Continue to cook for approximately 5 minutes, still stirring, until the mixture is thick and smooth.

Remove from the heat and add in the butter and the vanilla, whisking well to incorporate.

Allow to cool to room temperature.

To use for banana cream pie, pour into a pre baked pie shell that has been lined with slices of banana, then top with slightly sweetened whipped cream.

Merry Christmas: A snack for Santa


It's Christmas Eve and my house just got a little quieter.

I had to work today and did not get home until about 6pm. Despite this, we still managed to have our traditional fondue for dinner (I added raw shrimp and a hot cheese dip this year, replacing beef and spinach dip, what a great change!).

A bit of a cuddle to watch a Christmas holiday movie and then it was time to get at least one child settled and off to bed.

Christmas Eve has a another couple of traditions for us: each year the boys get to unwrap one present, which is always a new pair of pajamas. After changing, they get Santa's snack ready for him, set it out and then head off to bed.

The choice of drink is always chocolate milk (Santa knows he can warm it up if he'd like), and it is always an apple for the reindeer, not carrots. Long discussion when into choosing this - we figure Santa gets white milk at every other house, so he'd like a bit of a change. And the reindeer always get carrots, but why shouldn't they get a treat and something different as well?

This year, the boys chose to leave Santa some caramel shortbread squares, something I have been making for a few years. They can be made ahead and frozen, so lack of baking time is no excuse not to try these.

If Santa likes these squares as much as my family does, there won't be anything but crumbs left on the plate tomorrow morning.


Caramel Shortbread Squares
This recipe can be found in my baking binder, hand written on a scrap of paper, with no source given.

1 1/2 cups butter, softened and divided
1/2 cup icing sugar
1/4 tsp salt
1 1/4 cup flour
1 14oz can condensed milk*
3 Tbsp corn syrup
1 tsp vanilla
3 squares of semi sweet chocolate

Preheat oven to 350F.

In a large bowl, or with a stand mixer, beat together 1 cup of the butter with the icing sugar and salt, until light and fluffy. Add the flour and mix only until combined. Press into a 9x9, non-glass pan that has been buttered and floured.

Bake for 30-35 minutes, until golden. Allow to cool while you make the caramel.

In a medium sauce pan, melt the remaining 1/2 cup of butter over low heat. Stir in the condensed milk and the corn syrup. Keep an eye on this mixer and stir frequently until the caramel becomes golden and thick. When the caramel reaches your desired color, stir in the vanilla.

Pour the caramel over the crust, spreading evenly.

Melt the chocolate squares in the microwave, then drizzle the warm chocolate over the top of the caramel.

Chill for 3-4 hours before cutting into squares or bars. If you plan to freeze the squares, be sure to cut them before you freeze them.

Good at room temperature and still slightly frozen.


* Btw, a can of condensed milk in Canada reads 10 oz, whereas one from the US reads 14 - however I recently took a can from each country and weighed them. The can from Canada weighed 2 grams more than the one from the US, but it had a pull tab on the can. In other words, they are the same!

TFF: Cheese plus bacon


Nice cheesy bubbles, aren't they? Kind of draws you in, calls to you: I am high carb, high fat, and will comfort you.....

Did I mention it was 34C, before the humidity, when I made this? Okay, so sometimes I'm not so bright. But I was in the 'need' for a comfort food and Tyler's Recipe for Macaroni and Cheese with Bacon and Cheese was calling out to me. I couldn't help it.

I wasn't sure how the kids would feel about the topping of crispy bacon, onions and garlic on their cheese (I totally forgot to add the fresh thyme in), so I put it in a bowl and let them each choose for themselves. Both tried it, but my youngest waited until he was done his pasta and then tried a bit, separate.


The bacon added a nice saltiness to the mac and cheese, as well as a good crunch.

I admit, this tasted better two days afterwards, when it seemed to be cheesier and gooeyer. I like gooey mac and cheese. Now I like gooey mac and cheese with bacon on it.

This is this week's entry for Tyler Florence Fridays, where we pick any Tyler recipe we want and make of it what we will.

Macaroni and Cheese with Bacon and Cheese
from Tyler Florence

Kosher salt
1 pound elbow macaroni (I used whole wheat
4 cups milk
2 or 3 sprigs thyme
4 cloves garlic, smashed and divided (Uhm Tyler, where do the other two go? I just used all 4 here)
3 tablespoons unsalted butter
3 tablespoons all-purpose flour
5 1/2 cups shredded sharp white Cheddar (my cheese was orange and old cheddar, not sharp white, so I added in some Parmesan as well.)
Freshly ground black pepper
1/4 cup chopped flat-leaf parsley (skipped this, didn't have any)
4 slices bacon, cut crosswise into thin strips
1 large onion, diced
2 garlic cloves, smashed
Leaves from 1/4 bunch fresh thyme (oops, forgot this)

Bring a pot of salted water to a boil over high heat. Add the macaroni and cook for 8 to 9 minutes, until al dente. Drain.

Preheat the oven to 400 degrees F.

In a small saucepan heat the milk with the thyme sprigs and 2 garlic cloves. Melt the butter in a large, deep skillet over medium-high heat. Whisk in the flour and cook for about 1 minute, stirring constantly, to keep lumps from forming. Strain the solids out of the milk and whisk it into the butter and flour mixture. Continue to whisk vigorously, and cook until the mixture is nice and smooth. Stir in the 4 cups of the cheese and continue to cook and stir to melt the cheese. Season with salt and pepper. Add the cooked macaroni and the parsley and fold that all in to coat the macaroni with the cheese mixture. Scrape into a 3-quart baking dish and sprinkle with the remaining 1 1/2 cups cheese. Bake for 30 minutes, or until hot and bubbly.

While that bakes, heat a saute pan. Add the bacon, render the fat and cook until crispy. Add onion, garlic and thyme leaves and cook for about 5 minutes to soften the onion. Season with salt and pepper.

To serve, scatter the bacon mixture over the mac and cheese. Use a big spoon to scoop out servings, making sure you get some of the smoking bacon mixture on each spoonful.

The library, breakfast and Dorie


This breakfast started at our local library. I know, odd place to start a breakfast.

Actually, now that I think about it, it really started right here, on my computer, while I searched the library database for books.

You see, the little area that I live in doesn't have much. It has a convenience store. A bar. A cemetery and a little church. And a tiny branch of the City of Ottawa library, build inside an old, old church. So I can't buy more than bread, milk, or a beer here, but I can get a good read from the library.


If you've read my blog for awhile, you know I like Dorie Greenspan's Baking From My Home to Yours. I was even part of Tuesday's with Dorie for awhile (but could not keep up with one extra sweet recipe a week on top of what I was already making for the family.) Dorie's cookbook is one of my most favored and used books - if I could only grab one cookbook from my house (aside from my grandmother's hand written notes), it would be this one.

Dorie has other books too, but oddly, I have never seen any of them in any book store. I've looked. New or used, I've looked.

So I went to the library and found one, Pancakes from From Morning to Midnight.

I admit, I also ordered a bunch of other cookbooks, so Pancakes has not gotten my full attention yet. I have looked at it long enough to make one recipe though, Oatmeal-Raisin Pancakes with Cinnamon Sour Cream.


Quick to put together, I assembled the dry ingredients while my sous chef measured the raisins. Then he put together the Cinnamon Sour Cream (we used plain yogurt as I had no sour cream on hand,) while I assembled the wet ingredients and finished up the pancakes.

My little sous chef is having an 'I don't like raisins this week' thing right now, which is actually not like him at all, so while he liked the 'sauce' he objected to the raisins inside the pancakes and has requested I make them again with blueberries. This brother, however, went back for seconds (this picture is my plate, with 3 little pancakes - his brother ate 5 that morning, after a bowl of cereal, and finished off the last 3 this morning.) So I'd say they were a hit.

Oatmeal-Raisin Pancakes with Cinnamon Sour Cream
from Dorie Greenspan's Pancakes From Morning to Midnight

1 cup old-fashion oats
1 cup all - purpose flour
1/4 cup (packed) light brown sugar
2 teaspoons baking powder
1/2 teaspoon baking soda
1/2 teaspoon cinnamon
1 2/3 cup buttermilk
2 large eggs
4 tablespoons unsalted butter, melted
1/2 teaspoon pure vanilla
1 cup plump raisins

Cinnamon Sour Cream (recipe to follow)
maple syrup

In a medium bowl, whisk together the dry ingredients. In another bowl, whisk together the wet ingredients to blend thoroughly. Pour the liquid ingredients over the dry and mix gently with the whisk, just until combined. With a rubber spatula, gently fold in the raisins.

Heat a griddle or skillet over medium heat (to 350F if using an electric griddle) and lightly butter, oil or spray the surface.

Spoon the batter, 1/4 cup at a time, onto the griddle for each pancake. Use a spatula or the back of a spoon to light spread the batter into rounds. Flip when the undersides of the pancakes are golden and the tops are speckled with bubbles that have popped. Flip the pancakes and cook until the other side has been browned.

Serve immediately or keep in an oven that has been preheated to 200F.

Cinnamon Sour Cream

1 cup sour cream, full or nonfat (we used plain yogurt as it is what we had)
1 tablespoon plus 1 teaspoon brown sugar
1 teaspoon cinnamon.

Mix together in a small bowl until well combined. Store covered in the refrigerator for about 1 week.

TFF: Quick and simple


My picture looks nothing like Tyler's. His shrimp scampi looks visually appealing. Mine doesn't.

Which doesn't meat it wasn't good and tasty. It was. My little shrimp monster and I enjoyed it, my other two boys liked it, but prefer regular spaghetti sauce over shrimp on their pasta.

Oh well, I can't please everyone with every meal.

This is this week's entry for Tyler Florence Fridays.

Shrimp Scampi with Linguini
by Tyler Florence, as found on Food Network

1 pound linguini (I used whole wheat spaghetti)
4 tablespoons butter
4 tablespoons extra-virgin olive oil, plus more for drizzling
2 shallots, finely diced
2 cloves garlic, minced
Pinch red pepper flakes, optional
1 pound shrimp, peeled and deveined
Kosher salt and freshly ground black pepper
1/2 cup dry white wine
Juice of 1 lemon
1/4 cup finely chopped parsley leaves

For the pasta, put a large pot of water on the stove to boil. When it has come to the boil, add a couple of tablespoons of salt and the linguini. Stir to make sure the pasta separates; cover. When the water returns to a boil, cook for about 6 to 8 minutes or until the pasta is not quite done. Drain the pasta.

Meanwhile, in a large skillet, melt 2 tablespoons butter in 2 tablespoons olive oil over medium-high heat. Saute the shallots, garlic, and red pepper flakes (if using) until the shallots are translucent, about 3 to 4 minutes. Season the shrimp with salt and pepper; add them to the pan and cook until they have turned pink, about 2 to 3 minutes. Remove the shrimp from the pan; set aside and keep warm. Add wine and lemon juice and bring to a boil. Add 2 tablespoons butter and 2 tablespoons oil. When the butter has melted, return the shrimp to the pan along with the parsley and cooked pasta. Stir well and season with salt and pepper. Drizzle over a bit more olive oil and serve immediately.


TFF: Megan's Challenge, Quinoa Pilaf


It is time again for Megan's Challenge, our optional Tyler Florence Fridays recipe of the month, and I really, really pushed this one until the very end. This bowl is sitting on my counter right now, I haven't eaten it yet, just tasted.

I like quinoa but don't make it often as I'm the only one in the house who will eat it. So I was interested when I read Megan's selection for the month, but admit, I automatically decided I was removing the olives. I don't like olives. Or currents. Everything else I left the same, except I garnished with green onions (I didn't have any red on hand) instead of mint.

And I'm going to make one more change to it - I'm going to add in some crumpled feta cheese. My one taste found it needed something salty to replace the olives and to give it some umph and feta it will be.

I'm eating this for lunch today, which isn't that far away now, so I think I'll go add the feta in now, to give things time to mingle and meld together.

Btw, don't forget your congrats to Beth, last week's "winner" post, with her Roasted Tomatillo Salsa, who is featured on Tyler's blog.


Quinoa Pilaf
2 cups vegetable broth
1 cup quinoa, rinsed well
1 bay leaf
1/2 teaspoon turmeric
1 teaspoon salt and pepper
1 tablespoon olive oil
1 teaspoon preserved lemon rind, finely diced
1 tomato, finely chopped
1 (15-ounce) can artichoke hearts in water, drained and quartered
1/2 red onion, diced
(I didn't have any, used green onions, scallions, instead)
1/2 cup black olives, pitted
(left these out)
1/4 cup currants
(left these out)
Fresh mint leaves, for garnish
(I used more green onion)

In a small saucepan, combine broth, quinoa, bay leaf, turmeric, salt, pepper and olive oil in a saucepan. Stir in preserved lemon and cover. Simmer until water is absorbed, about 15 to 20 minutes. Turn off heat. Add tomato, artichokes, onion, olives and currants, mix well to combine. Top with mint and serve.


Tyler Florence Fridays: Quick but tasty salad


A quicky this week, I've got lots to do, so I'm squeezing in my submission for Tyler Florence Fridays this week. Be sure to check out last week's winner, Michelle of Big Black Dog and see her lovely and creamy Strawberry Lemon Pudding. You can also see her post on Tyler's blog. Congrats Michelle!

Okay, my salad. This is a variation on Tyler's Grilled Steak Salad with Texas Peaches, Pecans and Limes. See any pecans in there? Well, that's cause there aren't any. I'm not a big fan of pecans, so I subbed my pecans for goat cheese. And trust me, that sub works just fine!

I also changed things a bit by not making my own chili powder but using some I had on hand, along with a bit of extra cumin. And I added some lime juice and honey to the olive oil before I drizzled it on the salad.

Yes, I deviated quite a bit from Tyler's actual recipe, but that's okay, I'm sure Tyler of all people would be okay with that. Especially since it was tasty and enjoyed by all. My children loved having peaches and goat cheese on their salad, my husband liked that I did not put goat cheese on his.

For those of you who want to try the original recipe, here it is:

Grilled Steak Salad with Texas Peaches, Pecan and Limes
by Tyler Florence, as found on FoodNetwork

4 pounds skirt steak, trimmed of excess fat
1 recipe Ancho Chili Powder, recipe follows
Extra-virgin olive oil
Kosher salt and freshly ground black pepper
6 ripe yet firm peaches, halved and pitted
3 limes, cut into 1/4-inch slices
4 cups micro greens or baby mixed greens
1 cup toasted pecans

Lay the steak out on a large platter or piece of plastic wrap and rub both sides with the Ancho Chili Powder. Marinate for 1 hour so the flavors can penetrate the meat.

In the meantime, place a large grill pan on 2 burners over medium-high heat or preheat an outdoor gas or charcoal barbecue and get it very hot. Brush the grates with oil to keep food from sticking. Rub the peaches with oil and season with salt and pepper. Put the peaches cut-side down on the grill and cook for 5 to 8 minutes, until the flesh softens slightly and caramelizes. Turn them over with tongs and grill the other side for 3 minutes to char the skin; remove to a platter. Grill the lime slices for 2 minutes each side until slightly charred.

Scrape off the excess chili powder on the surface of the steak so it doesn't burn on the grill. Rub the steak with oil and season both sides with of salt and pepper. Grill the steak on the hottest part of the barbecue for 4 minutes per side, until well charred. Transfer the steak to a cutting board and let stand for 5 minutes. Cut the meat across the grain on the diagonal.

To serve: put the greens on a platter and arrange the peach halves, lime slices, and steak on top. Sprinkle with the pecans and drizzle the salad with the olive oil.

Ancho Chili Powder:

3 ancho chiles, seeded and hand-torn into pieces
2 tablespoons chili powder
2 tablespoons ground coriander
1 tablespoon ground cumin
1 tablespoon sweet paprika
1 tablespoon dried oregano
1 tablespoon garlic powder
1/4 teaspoon ground cinnamon
1 teaspoon sugar

This homemade chili powder will add a smoky depth to chili and as a dry rub for steaks. Toast the ancho chile pieces over low heat in a dry skillet until fragrant, shaking the pan so they don't scorch. Put the chiles in a mini food processor and pulse to a powder. Add the remaining ingredients and buzz again to combine.


TFF: A sweet little dessert


Before I get into my selection for this week's Tyler Florence Friday, did you see who "won" last week and was featured on Tyler's very own blog? It was me!!!

Thank you, thank you, thank you! I could not have done it without Tyler's lovely recipe, some good shrimp, and most of all, my family! I love you all! Hehehehe (Is that really how award speeches go? I never watch awards, so I was being silly in winging it, so seriously? Is that really the kind of thing people say when they receive an award?)

Okay that was fun, now back to the seriously stuff: dessert!

How about Tyler's Lemon Blueberry Cheesecake Bars? While blueberries aren't quite in season yet, they freeze fabulously, so good berries are always available to make this tasty little bar. Okay, it is really a cheesecake baked square and cut into bars, but it's still tasty!

The only change I made was to use lower fat cheesecake instead of a full fat (I think I've said before that I like the extra tang you get from the lower fat version). Otherwise I followed it faithfully. I even cut it into the recommended number of bars. I didn't cut it evenly or well, but I did get the same number of pieces that Tyler told me I would.

Be sure to head over and check out some of the recipes Tyler has posted on his blog. There is quite the selection available.

Lemon Blueberry Cheesecake Bars
by Tyler Florence, as found on Food Network

For the base:
Butter, for greasing
2 tablespoons sugar
1/8 teaspoon ground cinnamon
9 graham crackers
1/2 stick unsalted butter, melted

For the filling:
16 ounces cream cheese, room temperature
2 eggs
2 lemons, zested and juiced
About 1/2 cup sugar, eyeball it
1 1/2 cups fresh blueberries
Powdered sugar, for dusting

Preheat oven to 325 degrees F.

For the base:

Grease the bottom of a 9 by 9-inch baking pan with butter. Then place parchment paper over the top, pressing down at the corners. In a food processor, process the sugar, cinnamon and graham crackers until you have the texture of bread crumbs. Add the melted butter and pulse a couple of times to fully incorporate. Pour into the lined baking pan and gently pat down with the base of a glass. Bake in the oven for 12 minutes until golden. When done set aside to cool.

For the filling:

Add cream cheese, eggs, lemon zest, lemon juice and sugar to the food processor and mix until well combined. It should have a smooth consistency. Pour onto the cooled base and then cover with blueberries. They will sink slightly but should still be half exposed -- as the cake bakes they will sink a little more and break down.

Bake in the oven for 35 minutes or until the center only slightly jiggles. Remove from the oven and cool completely before refrigerating for at least 3 hours. Once set, remove from pan using the parchment lining and slice into 10 rectangular bars. Dust with powdered sugar.


TFF: Why I like Tyler


Do I really need to say more than that?

Look at that plate, the golden, crispy shrimp. With more crunch added from pieces of scallion and ginger and garlic. Isn't it beautiful to look at? Doesn't it make your mouth water?

And it should, it tasted FABULOUS!!!

I admit, I had to fight off my six year old on this - he loves shrimp and would happily have eaten twice as much of it that he did. I had to limit him, though, as his father and I still had to eat.


I paired the shrimp, Tyler's Salt and Pepper Shrimp, with a cold noodle salad that I'd thrown together: soba noodles, seasame oil, green onions, a touch of chili sauce, lime juice and toasted seasame seeds on top. A great accompaniment, the cold of the noodles, with the slight crunch of the seeds, with the crunch and warmth of the salt and pepper shrimp. Wonderful.

It was so good, I'm sharing it this week with all the lovely contributors of Tyler Florence Fridays. Go check it out, and don't forget to offer congrats to Natashya, who's post about Cuban Mojitos, won her a spotlight on Tyler's own blog. I don't drink much in alcohol and I admit, those Mojitos looked very good.

Salt and Pepper Shrimp
by Tyler Florence, as found on Food Network

2 quarts peanut oil (I used vegetable)
Kosher salt and freshly ground black pepper
4 cups all-purpose flour, plus 2 cups for dredging
2 pounds large prawns, shelled and deveined, with tail attached
4 egg yolks
4 cups chilled soda water
2 tablespoons shaved garlic
2 tablespoons shredded ginger
1 bunch green onions, sliced on a bias angle
1 jalepeno pepper, sliced into rounds (skipped this, wanted the kids to eat it)
Serving suggestion: fresh lemon wedges (also skipped this, didn't need it)


In a large wok, heat the oil over medium-high to 370 degrees F.

Meanwhile, season 2 cups of the flour with salt and freshly ground black pepper. Dredge the shrimp in the seasoned flour.

In a large mixing bowl, whisk the remaining 4 cups of flour with the egg yolks and soda water. Hold the shrimp by their tails dip them into the batter.

Working in batches, fry the shrimp in the hot oil, turning them once, until they are golden brown, about 3 minutes per batch (I found it took closer to 6 minutes per batch). Remove the shrimp from the oil and drain them on paper towels. While they are still hot, sprinkle the shrimp generously with salt and freshly ground black pepper. Transfer the shrimp to a serving tray.

When the shrimp are cooked, carefully pour off all but 1/2 cup of the oil. Add the garlic, ginger, green onions and jalapeno and fry until crispy. Spoon the seasoning over the shrimp and serve immediately accompanied by lemon wedges.