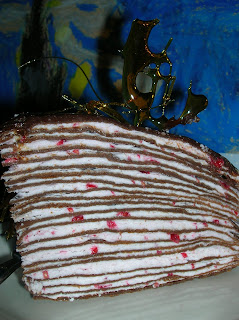
Daring Baker's Challenge: Chocolate Crepe Cake!


***WARNING*** THIS CAKE IS NOT FOR THE FAINT OF HEART!

After the confusion of multiple recipes that was the Red Velvet cake, it was decided to go about picking our monthly challenge in a slightly different way. Rather than have us all submit and idea and then vote on it (with 30 of us, that's alot of ideas!) we each were "assigned" a month and for that month would get to pick the recipe and decide the rules.

The first Daring Baker to choose was Brilynn, who decided that we would make the crepe cake that had been narrowly outvoted the month before.

Not only did Brilynn get to choose the recipe, she also got to set the "rules". In this case we were to use the recipe she provided (though how we present the recipe is our choice) and could only make substitutes if there was an allergy or health concerns with an ingredient, or if you just could not find the ingredient! I likely will have the same guidelines when it is my turn to choose in June (and if you have a suggestion for something you'd like to see the Daring Baker's make during that month, please comment on it! I have an idea of where I want to go right now but am still very open to suggestions!)

First another small disclaimer - this cake does not involve any baking!

What it does involve, however, is a tonne of patience and about 3 hours. Mostly patience though.

Now the really big disclaimer - this recipe sucks!

Oh sure, it is impressive enough. After all, it is a "Martha" recipe. Which to me means it is looks with no substance. And of course it will be complicated and a pain in the ***!

The "cake" comes down to several steps - make chocolate crepe batter then let it rest in the fridge. Make approximately 35 - 8 inch crepes using the chocolate batter then stack them up with a hazelnut cream filling between the layers of crepes, chill, then cover in a chocolate glaze. While it is setting up, make candied hazelnuts and sugar strings to top the cake with.

Should you be an accomplished baker/cook, no problem! In theory! In reality? Run now! Run screaming and yelling as far and as fast away from this cake as possible! AAAAAAaaaaarrrrggggg!!!

Let's start with the crepes. I do know how to make crepes. Really. I can. I can make stacks of evenly shaped, tasty crepes with no problems (and no burnt finger tips.) What I can't make is these crepes. If that's what they really were. Personally, I thought they were more like thin rubbery disks. And that's the ones that survived.

I don't own an 8 inch crepe pan. Or even an 8 inch non-stick pan, so I used what I had, a 12 inch non-stick. Because I was using a bigger pan, I tried at first using more batter, to compensate. Result? One wreck of what what supposed to be a crepe.

Recipe 1 - Me 0.

So I increased the amount again, ended up in the end using 1/3rd cup batter per crepe. I probably made close to 32 crepes, but ended up with a cake having 21 usable crepes. Not all of them without rips or tears, but they were similar in size and thickness. Considering I was going for a larger sized cake than what the recipe called for, I could live with the drop in height.

I didn't trust the recipe, which said I could just stack the crepes on top of each other. And I'm glad I didn't. I may have exhausted my supply of wax paper (and made a large dent into my parchment supply), but I won the battle of the stuck together crepes!

The filling is where I got my chance to be a bit original. I could not use the hazelnut cream filling. Hazelnuts are on the banned list from my home. So I used raspberries instead. Aside from replacing the 1/3 cup of cream for 2/3 cup of crushed raspberries (nothing added, no straining, just smushed) I stuck with the filling recipe exactly.

Personally, I think the addition of the butter was a bit much, pushed it over the top for richness, but OMG! The filling was so good you could eat it with a spoon! I considered stopping right there and making the mouse my submission for HHDD!

(Believe it or not, this was my left over filling - I really didn't just help myself to it, before I'd done the cake, and eaten it all. That took some restraint, but I did it!)

Initially I had decided I was going to have to pipe the filling in between the layers of crepes - surely the crepes that kept falling apart as I made them would be too delicate to spread the mousse onto? Well it wasn't - the rubber, I mean, the crepes, handled the filling just fine, and my layers came together quickly and with no issues, while my glaze cooled.

Again with the glaze, I made no changes to the recipe. I left it to cool and when it was ready, and my cake had had a chance to chill a bit, I tried spreading the glaze over the top and sides of the cake. Top is easy - but have you ever tried to get melted chocolate to go evenly down the side of a ragged edged cake? And not end up ripping the sides and spreading the filling everywhere?

Don't bother. It's not worth it.

Instead I went for the slightly rustic look.

The last part is the part I had the most fun with. Okay, the only fun.

Again, hazelnuts are a no-no. So no candied hazelnuts to top my cake. Candy, on the other hand, was fair game! Melting together sugar and water, I made my first sugar syrup for spun sugar!

For those who know me in person: imagine if you will - in my kitchen, standing high on a chair, in my pj's. On the floor below me is a big metal sheet pan with a silpat on it, and there I am, standing on my toes, holding a fork full of melted sugar above my head so it could make hair on the pan below! My 4 year old watched me from the living room, wondering, I'm sure, "What the heck is that crazy lady doing?"

I was making mounds of sugar hair! It was so fun! Unfornately, none of it survived the humidity around me, and all clumped into a big mess. Fortunately I had also tried some pulling of sugar to make some larger pieces, and had tried just pouring the sugar onto the mat. So I still had some nice looking sugar toppers for my crepe cake.

Which tasted terrible!

Actually, the filling tasted great. The texture of the crepes, however, was awful! No one at dinner that night (I made mine for dessert for Easter Dinner), finished a piece, and no one asked for seconds. Not adult or child. To be fair, the next day I presented some to my tester neighbour, for her honest opinion, and they loved it. When I tried it again, I found that sitting in the fridge over night had made a HUGE difference to the texture of the crepes. They still weren't delicate, but they were much less rubbery.

This cake has been almost a perfect project for the Daring Bakers. Some of the members of this group are absolutely amazing in the kitchen, some of us are a bit more on the novice side, but still Daring. We were challenged, we were frustrated. We laughed, we cried, and in the end, some of us did not succeed (which totally amazes me that I was able to - I must have been lucky that day!) And remember I said almost perfect.

And in the end, we all still love Brilynn, despite this recipe!

If you decide to make this recipe.... Remember I warned you!

P.S. Don't forget to check out all the other posts by the rest of the Daring Baker's - see the side bar for the complete list!


Darkest Chocolate Crepe Cake

Ingredients
  • 3/4 Cup (1 1/2 sticks) cold unsalted butter, cut into pieces, plus melted for pan
  • 8 Ounces semisweet chocolate, finely chopped
  • 1 1/2 Cups all-purpose flour
  • 1/3 Cup sugar
  • 1/2 Teaspoon salt
  • 2 1/2 Cups whole milk, room temperature
  • 6 large eggs, room temperature
  • 1 Tablespoon pure vanilla extract

Directions

  1. Bring 1/4 cup water to a rolling boil in a small saucepan over medium-high heat. Add butter, 1 piece at a time, whisking to combine after each addition. Remove from heat; stir in chocolate until completely melted. Set aside.
  2. Whisk together flour, sugar, and salt in a medium bowl. Whisk together milk, eggs, and vanilla in another medium bowl. Gradually add milk mixture to flour mixture, whisking until smooth. Add chocolate-butter mixture, whisking until smooth. Pour through a fine sieve into an airtight container; discard lumps. Refrigerate at least 2 hours or up to overnight.
  3. Lightly coat an 8-inch crepe pan or nonstick skillet with melted butter. Heat over medium heat until just starting to smoke. Remove pan from heat; pour about 2 tablespoons batter into pan, swirling to cover bottom. Reduce heat to medium-low; return pan to heat. Cook, flipping once, until edges are golden and center is dry, about 30 seconds per side.
  4. Slide crepe onto a plate. Repeat process with remaining batter, coating pan with butter as needed. Crepes can be refrigerated, covered, up to 1 day.
  5. Place a crepe on a wire rack set over a rimmed baking sheet. Spread with about 3 tablespoons hazelnut filling. Top with another crepe. Continue layering with hazelnut filling and crepes, using about 32 crepes and ending with a crepe on top. Refrigerate until firm, about 15 minutes.
  6. Spoon 1/2 cup glaze on top of the cake, spreading to edges. Spread remaining glaze around sides of cake, coating completely. Refrigerate until glaze is firm and set, about 20 minutes. Cake can be refrigerated up to 3 days. Garnish with toasted and candied hazelnuts.

Hazelnut Filling

Ingredients

Serving: Makes about 8 cups

  • 2/3 Cup heavy cream
  • 6 large egg whites
  • 1 2/3 Cups sugar
  • 1 3/4 Cups (3 1/2 sticks) unsalted butter, cut into pieces, softened
  • 1 Teaspoon pure vanilla extract
  • 1/3 Cup hazelnut cream, (available from Whole Foods Market, www.wholefoods.com)
  • 1 salt

Directions

  1. Put cream into the bowl of an electric mixer fitted with the whisk attachment; beat on medium-high speed until soft peaks form, about 4 minutes. Transfer to a medium bowl. Refrigerate 1 hour.
  2. Whisk egg whites and sugar in the clean bowl of mixer set over a pan of simmering water until sugar has dissolved and mixture registers 160 degrees;, 2 to 3 minutes.
  3. Attach bowl to mixer fitted with the clean whisk attachment; beat on high speed until slightly cooled and stiff (but not dry) peaks form, about 5 minutes.
  4. Fit mixer with paddle attachment. With mixer on medium-low speed, add butter, several pieces at a time, mixing well after each addition (meringue will deflate slightly as butter is added). Add vanilla, hazelnut cream, and salt; mix until mixture comes together, 3 to 5 minutes. Fold in whipped cream with a rubber spatula. Use immediately.

Chocolate Glaze

Ingredients

Serving: Makes about 2 cups

  • 1 1/4 Cups heavy cream
  • 1 Tablespoon light corn syrup
  • 1 salt
  • 10 Ounces semisweet chocolate, finely chopped

Directions

  1. Bring cream, corn syrup, and salt to a boil in a medium, heavy saucepan over medium- medium-high heat. Remove from heat. Add chocolate; swirl pan to cover completely with cream. Let stand about 5 minutes. Stir until smooth. Let cool completely.

Candied Hazelnuts

Ingredients

Serving: Makes 9

  • 9 hazelnuts, toasted and peeled
  • 1 Cup sugar

Directions

  1. Thread each hazelnut onto tip of a long wooden skewer; set aside. Place a cutting board along the edge of a countertop; set a baking sheet on floor next to edge.
  2. Cook sugar and 1/4 cup water in a medium, heavy saucepan over medium heat, stirring occasionally, until sugar has dissolved. Continue to cook, without stirring, until syrup comes to a boil, washing down sides with a wet brush to prevent crystals from forming. Let boil until syrup turns light amber, about 5 minutes; remove from heat. Let stand until slightly cooled, 8 to 10 minutes.
  3. Dip 1 skewered hazelnut into syrup, coating completely and letting excess syrup drip back into pan. When dripping syrup becomes a thin string, secure end of skewer under cutting board, letting caramel string drip over edge onto sheet. Repeat with remaining hazelnuts. Let stand until caramel has hardened, about 5 minutes. Break strings to about 4 inches. Carefully remove skewers.
Martha Stewart Recipe via the website.

A Taste of Yellow: Behind the icing


Yes, another cake post, another update on cake class (the last of cake 1, on to cake 2 next week.)

However, this time I thought ahead so that I could participate in a special blogging event, called A Taste of Yellow, hosted by Barbara of Winos and Foodies. Barbara, a cancer survivor herself, decided to host this event to help raise awareness for the Lance Armstrong Foundation and cancer. All it required was for us foodie bloggers to make something involving a yellow ingredient! How much easier can it be to help support a good cause?

With this event in mind, I present the last cake of cake 1 class, a lemon layer cake, iced in pale yellow, and topped with my first ever roses!

Now don't get too excited - I need so much more practice to make a really good rose that it is scary. Roses are the most frustrating thing to make - and I found them so much harder to do than making croissants!

However even a slightly ragged rose with a horrible center bud (that is my biggest problem, getting that first bud), is a pretty rose.

This is the third cake I've made in the last three weeks for this class, but is going to be the first cake that I actually talk about the cake itself, not just the icing. (Have I mentioned that I don't think I really like icing anymore? At least not to eat - though I suspect if you gave me cream cheese icing, I could live with that.) I can't tell you how this cake tastes, yet, since I haven't yet cut into it. I can tell you it was very quick to make, using this recipe:


LEMON LAYER CAKE WITH LEMON CREAM FROSTING

For cake layers
2 cups sifted cake flour (not self-rising; sift before measuring)
3/4 teaspoon baking soda
1/4 teaspoon salt
1/2 cup whole milk
2 1/2 tablespoons fresh lemon juice
1 stick (1/2 cup) unsalted butter, softened
1 cup granulated sugar
2 large eggs

For frosting
1 cup heavy cream
1/2 cup confectioners sugar
Lemon curd, chilled

Make cake layers: Preheat oven to 375°F. Butter 2 (8- by 2-inch) round cake pans and line bottoms of each with rounds of wax or parchment paper. Butter paper and dust pans with flour, knocking out excess. Sift together flour, baking soda, and salt. Stir together milk and lemon juice (mixture will curdle).

Beat butter in a large bowl with an electric mixer until creamy. Gradually add sugar, beating until pale and fluffy. Add eggs 1 at a time, beating well after each addition. Alternately add flour mixture and milk mixture in batches, beginning and ending with flour, mixing at low speed until just combined.

Divide batter between pans, smoothing tops. Bake in middle of oven until a tester comes out clean, about 20 minutes. Cool in pans on racks 10 minutes, then invert onto racks, remove paper, and cool completely.

Make frosting: Beat cream and confectioners sugar with cleaned beaters until it just holds stiff peaks. Fold one third of whipped cream into lemon curd to lighten, then fold in remaining whipped cream.

Assemble cake: Put 1 cake layer, rounded side up, on a cake plate and spread with one fourth of frosting. Top with second layer, rounded side up, and spread top and sides with remaining frosting.


Makes 1 (8-inch) layer cake

Now I did not make the frosting since I had to use the class "butter cream." If it turns out I like this cake, then I will try it again using the recipe's frosting.

One note - yes the recipe makes 1 8 inch layer cake, which it does, but the layers are not very high. I actually had some concern when pouring the batter in the pans that I would have to go back and make another batch so I could have a third layer for a more "normal" height of cake. In the end I decided to leave well enough alone and go with a slightly shorter cake, knowing it would be topped with mounds of icing later.

If you haven't already, head over to Barbara's blog and read up on A Taste of Yellow - then get baking and make something to show your support of yellow!

More Cake Class!


I just finished week 3 of my 4 week cake class. Alot to learn in a small time frame, only 2 hours per week for 4 weeks.

As a recap: for week one we did no hands on work but instead learned how to make the Wilton Buttercream icing (which has no butter, or cream but is instead made with shortening) and how to crumb coat and flat ice a cake. I apparently only learned some of that information since I completely missed that I should be using a thin consistency icing to ice my cake, not the medium consistency I did use, which kept trying to peel off my cake! I think I can remember this for next week's cake. Hopefully.

On week two we learned stars, zig zags, the base of the Wilton rose and writing. All items that would let us create a character cake, or really any type of cake.

This week had even more information in it: shells, dots, more flowers, more of the rose (which I just could not seem to get and have to practice, practice, practice for next week!), ending with color stripping so that we could make multi-colored clowns. I think I got a little carried away with my red color as the color ended up leeching through the bag onto my hands but look at the vibrant colors of my clowns!

I mentioned something to the instructor last night- Wilton, or Michael's, really needs to add some more information to their class description and student kit. When you sign up you are told the cost of the class, plus supplies, which you can purchase as a simple box with a few supplies for $24.99. In it you will get a bag, a few disposable bags, your rose nail, pallet knife, tips, brush, and practice board. What you don't learn is that you will need to buy meringue powder, a mountain of icing sugar, shortening, flavoring, more disposable bags, either plastic or parchment. Not to mention 3 cakes. It adds up, it adds up very, very fast!

Good news is that for class 2 I will only need to make one cake, and it is for the last class. The student kit for that class includes the cake pans you would need to make them also. Of course it is recommended that you purchase a cannister of the color base powder, which will essentially let us make Royal icing, so again, more hidden costs.

Next week is the last class of this course. We will be finishing off our roses to decorate our final cake, as well as learning vines and bows. If my families schedule allows it, I will be moving right into course 2, though I suspect soccer will probably take priority and I won't get into the next class until September.

HHDD: Mousse!

When Helene of Tartelette put out the call for everyone to submit examples of mousse for this round of Hay Hay Donna Day! I had a quirky smile.

I like mousse, though I admit to not having made one before. I've never made one before because my husband does not like mousse, and it is always a bad idea to make a dessert recipe where I might be the only one who eats it. Sure the children could contribute - afterall, mousse is very similar to a pudding with a different texture. It's the texture that made it iffy that the children would eat it.

But I like mousse. And Helene said make mousse. So I had to do it! Even at the risk that I would eat it myself. (Low risk, I have a number of testers who are willing to eat anything I put in front of them - I just don't happen to live with any of them!)

I admit, I wanted chocolate mousse. Not your regular boring, brown chocolate mousse - I wanted white chocolate mousse. Especially if I could pair it with either raspberries or cranberries.

Which is why I present to you my submission for HHDD - Lime Curd Mousse Cake!

You can see the connection between white chocolate, raspberries and cranberries, right?

Glad you can, because I can't!

I went looking, searching through my books (I can't believe Dorie didn't have a mousse recipe!) and then through various websites. When I came across this recipe, it was for Lemon Curd Mousse Cake, which would have been fine. But then I mentioned it to the mousse-disliking husband, and he said, "Could it be lime maybe?"

Since both of us prefer lime to lemon, how could I refuse?

I'm afraid I made this when one of my Daring Baker's sisters was having a horrid weekend, all because of curd. So before I proceed, I need to say - I'm sorry Lis! My curd (again another thing I've never made before) came out the first time with not hitches! (Of course mine seemed to be a backwards recipe, with everything mixed together, then cooked, so that might have helped prevent curdling.)

I've copy and pasted over the recipe I used from Epicurious.com. I followed the recipe almost exactly - swapping out lime for lemon, and graham crackers for shortbread cookies. The graham cracker switch was a matter of what was in my pantry, but worked out well, which is no surprise to me as I love graham crackers.

I am very pleased with how this cake came out - it was bright, fresh, not too sweet or too sour, and light. It took a bit more time than making a mousse in a glass, with all the various steps, but was well worth it!

Curd
2 1/3 cups sugar
4 teaspoons cornstarch
1 cup fresh lemon juice
4 large eggs
4 large egg yolks
3/4 cup (1 1/2 sticks) unsalted butter, cut into 1/2-inch cubes

Crust
Nonstick vegetable oil spray
2 cups shortbread cookie crumbs (about 7 1/2 ounces)
1/4 cup (1/2 stick) unsalted butter, melted

Mousse
5 tablespoons water
4 teaspoons unflavored gelatin

6 large egg whites
3/4 cup sugar
1 1/2 cups chilled heavy whipping cream

Lemon slices, cut into quarters (garnish)

preparation

For curd:
Mix sugar and cornstarch in heavy large saucepan. Gradually add lemon juice, whisking until all cornstarch dissolves. Whisk in eggs and yolks. Add butter. Stir over medium heat until curd thickens and boils, about 12 minutes. Transfer to medium bowl. Chill until cold, at least 6 hours. (Can be made 1 week ahead.

Press plastic wrap onto surface of curd and keep chilled.)

For crust:
Preheat oven to 350°F. Spray bottom of 8-inch-diameter springform pan with nonstick spray. Blend cookie crumbs and butter in small bowl. Press onto bottom of pan. Bake until golden, about 15 minutes. Cool.

For mousse:
Pour 5 tablespoons water into small saucepan. Sprinkle gelatin evenly over. Let stand until gelatin softens, about 15 minutes.

Meanwhile, place 1 3/4 cups lemon curd in large bowl. Stir 3/4 cup curd in another small saucepan over medium-low heat until very warm.

Stir gelatin mixture over medium-low heat until dissolved and liquid is clear (do not boil). Whisk warm gelatin mixture into 3/4 cup warm curd. Gradually whisk gelatin-curd mixture into curd in large bowl. Using electric mixer, beat egg whites in medium bowl until soft peaks form. Gradually add sugar, beating until whites are thick and glossy. Fold whites into curd mixture in 3 additions. Using same beaters, beat cream in another medium bowl until peaks form. Fold into egg white-curd mixture in 3 additions. Pour enough mousse over cooled crust to fill pan completely. Pour remaining mousse into small bowl and reserve. Cover and chill mousse cake, reserved mousse, and remaining curd overnight.

Using long thin knife, cut around cake to loosen. Remove pan sides. Gently spread 3/4 cup of remaining curd over cake. Transfer reserved mousse to pastry bag fitted with small star tip. Pipe rosettes of mousse around top edge of cake. Chill cake until ready to serve. (Can be made up to 8 hours ahead.)

Arrange lemon slices between rosettes. Cut cake into wedges.

Bon Appétit, April 2005

Time For Dessert

Mini "Refund" Muffins

Food bloggers are sometimes such a funny group. It is amazing how one little recipe can make the rounds, and how things travel. Just look at the Daring Bakers - up to 30 members, all quickly becoming fast friends, with more people asking to join on a regular basis!

Some recipes just bear repeating, and some stories need to be spread near and far. These muffins are a perfect example of both!

Known once as Snickerdoodle muffins, they were originally posted by Daring Baker Peabody on her blog Culinary Concoctions by Peabody. A stiff muffin batter that is rolled in cinnamon sugar and baked to a warming, comforting treat. She enjoyed them, so she posted about them to share with whomever wanted to try them. Many people did - one of the original comments was that these were the "best muffins ever!"

I guess there is just no accounting for taste, however. Seems one reader made them and didn't like them. Okay, I guess. I don't like everything, most people don't. And everyone has recipes that don't work out, no matter how well we follow the directions. When that happens to me, I just don't make the recipe again (unless I'm positive I screwed up, then I try again.) Life goes on.

But to submit a bill for the cost of the ingredients to the blogger who's recipe you didn't like?

Sad thing - I am not kidding! Someone seriously submitted a bill to Peabody! Does this mean I can submit a bill to every author of every recipe I ever made that I didn't like?

OMG! I would be loaded! Especially if I can bill for the emotional turmoil!

Dear Martha,
I recently tried your recipe for xxxxxxxxxxxx and it was awful! Your instructions were of no help as they were completely and totally impossible to follow! I wasted hours trying to make my xxxxx, the primary compotent for this recipe! Please find enclosed a bill for not only the ingredients, but also the time spend and for the emotional damage your recipe caused me. Sincerely,
All things edible.


Like I said, there is no accounting for taste. The last tray of my mini muffins, now known in blog land as "Refund Muffins" thanks to another Daring Baker, Breadchick and her blog The Sour Dough, has just come out of the oven. My children could not wait until the last batch was done to try them - the entire house smells warm and comforting, with cinnamon and nutmeg scenting the air! So far from their little taste test I've heard, "Yummy!" "These are the best ever!" "MmmmcanmmmmImmmhavemmmmmore?" "I just can't stand it, not being allowed to have another one!" (That last comment was followed by an 8 year old stomping out of the room in a pout, until I told him he could have some in his lunch at school, then he stopped stomping.)

So I guess it is time for me to write my own letter:

Dear (Mr.) Peabody,
Please find enclosed the bill for the ingredients used in making your Snickerdoodle muffins. I made them, a total of 60 mini muffins, and they were.....

Oh wait! I can't send her a bill - we loved them! They were so good!

Peabody - I give to you the most honest testament any baker can give to another:


Snickerdoodle Muffins

from Culinary Concoctions by Peabody

2 sticks unsalted butter, softened
1 cup sugar
2 tsp vanilla
2 eggs, at room temperature
¾ tsp baking soda
¾ tsp baking powder
¾ tsp cream of tarter
¾ tsp freshly grated nutmeg
1 and ¼ cup sour cream (I ran short of light sour cream so used plain yogurt for the balance)
2 and ¼ cups all purpose flour

1 cup sugar and 2 TBSP cinnamon mixed together for rolling

Makes 12 -14 regular muffins, or 60 mini muffins

Pre-heat the oven to 350 degrees (F). Prepare muffin tins with cupcake papers and lightly grease with cooking spray.

In a medium bowl, mix together the flour, baking soda, and baking powder and cream of tarter and set aside. Using a stand mixer on medium low speed or by hand, cream the butter and sugar until soft and fluffy (about 3 to 5 minutes). Add vanilla. Add eggs one at a time and mix until each egg is fully combined with the sugar, butter, vanilla mixture. If you are using a stand mixer, turn the mixer to low and add the flour mixture and the sour cream alternately to the egg-butter mixture. Start with the flour and end with the flour. Scrape the bowl occasionally to get all the ingredients combined thoroughly. Do not over mix though. The dough will be firm but not clumpy.

Using an ice cream scoop or soup spoon, scoop out muffin batter one at a time and drop into a shallow bowl filled with the cinnamon sugar mixture. Roll the muffin around in the mixture until it is covered completely in cinnamon sugar.

Once the muffin dough-ball is completely covered in cinnamon sugar, place dough-ball in prepared muffin tin.

Bake them for approx. 12-14 minutes for mini muffins, or 20-22 minutes for normal muffins, or until they are golden brown. Let cool for about 5 minutes before removing from tins to allow the cinnamon sugar crust to firm up. Serve warm.


Guess what I've been up to.

So I decided it was time to move forward with something I've been wanting to try for awhile - cake decorating!

With that in mind, I signed up for a class at Michael's, Cake 1, which started last week but only today did we actually get hands on and start doing some actual decorating.

Where I proved that I am insane.

We had three choices for cakes for tonight: a character cake, which our instructor told us could take over 2 hours to do; an 8 inch round which would be turned into a rainbow cake and would require 5 colors and pipping gel and transfers; or an 8 inch round and cookie cutters with our choice of colors.

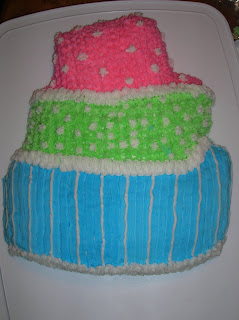
You'd think I would have picked the easier one, the same cake 10 of the other 11 people chose, but no, I went my own way and picked something closer to a character cake, a topsy turvy cake, with a pan borrowed from a friend.

I didn't manage to finish my cake in the class, but it didn't take me as long as the 2 hour minimum suggested. Actually I started finishing it in the last 4 minutes of the Senator's game and finished before the puck was dropped for the Vancouver game.

And here it is!

I admit, my hands hurt some, and the cake isn't completely what I wanted, but I am fairly satisfied with the results, especially considering it is my first cake and the shape is odd.

And I learned that I can pip icing very well with my left hand, almost better than my right. Probably because I do it slower and pay more attention to it. This is a skill I will be quite happy to have in the future!

I learned today that I could take the fondant and gum paste course without the other two cake classes as a prerequisite. I'd like to take the other 2 courses but suspect I will have to wait until the fall as soccer season for two little boys is about to start, as well as their usual activities.

More pictures after next week's class!

Baking my way out of a funk


For some reason, the second Red Velvet cake I made for last weeks' Daring Baker's challenge put me in a funk.

Actually, I know the reason - disappointment.

I have such high expectations of my grandmother's recipes that having one be a dud was crushing! (The fact that both my little boys liked it did not help me at all. It was a dud.)

I had such a need to make something that I wouldn't be disappointed in, but didn't know where to start. The piles of cookbooks I have, all those wonderful blogs and websites, and my funk was such that I just couldn't figure out what I wanted.

Peabody actually helped - with all those cheesecake food porn, all those blogs with recipes, what else could I possibly make but cheesecake? But which one?!?!

As much as I wanted to make the winning entry, from Helene, a fellow Daring Baker, the funk was no fun. (And I wanted to make it before she won!) I wanted cheesecake. I wanted caramel flavor, I wanted lightness. I didn't want to follow a recipe.

So I did something I never do when it comes to baking - I made one up! (That way I had no one but myself to blame if it didn't work?)

I wrote everything carefully down when I did this. So of course now I can't find where I put the notes I made. So if you try this and it doesn't work, I may be misremembering things and I'm very sorry!


Mini Cheesecakes


Base

2 cups crushed up graham crackers
1/2 cup brown sugar
1/3 cup melted butter, unsalted
pinch salt


Cheesecakes

2 250g packages light cream cheese, softened
2 250g packages regular cream cheese, softened
2 eggs
1/2 cup white sugar
1/2 cup brown sugar, packed
1/2 cup sour cream
pinch salt

Preheat oven to 350F.
Line muffin pans with paper. This will make 18-24 (exact unnumber because I only used 1 muffin pan then made the rest in some corningware I had on hand.)
Mix base ingredients together well. Scoop 1 tablespoon of mix into the bottom of each muffin cup. Using a small glass or a measuring cup bottom, press base down until it covers the bottom of the muffin cup and is fairly compact. Bake for 8-10 minutes, until firm and golden. Allow to cool slightly before filling.
While bottoms cool, mix all the cream cheese together in the bowl of a stand mixer, using a paddle attachment, until fluffy. Mix in both sugars with cream cheese and continue to beat until well combined. Add in eggs, one at a time. When well mixed, add in pinch of salt and the sour cream. Try not to over mix, however you want a smooth batter.
Spoon batter into muffin cups, about 2/3 full.
Bake at 350F for 20-23 minutes. Allow to cool before chilling for a few hours.


I had planned to make a caramel sauce with these but didn't have the patience. Or the need, as it turns out. They were creamy, a touch of tang, but mostly a slight caramel like hint from the brown sugar in both the base and the filling.

My children inhaled them, where they could get past me, as they were exactly what I needed!

Daring Baker's Update


After the various successes with last month's challenge, the Red Velvet Cake, fourteen new baker's have joined our crazy ranks!

Welcome all you new bakers! I know some of you from your blogs already, and those that I don't, I'm looking forward to getting to know you better through your blog and our baking.

Being a lazy morning right now, I won't list everyone off by name (okay, because I'd be sure to miss someone!) but you can see who the Daring Baker's are by checking out their blogs, which are all listed on the right under the name Daring Bakers. (I'd have it posted under the lovely logo which we have but I can't seem to get it to go up there - I'll figure it out eventually!)

Saturday with the family


Guess what we did.

Can you say, "Holy sugar overload!"

Living in Ottawa, we are fairly close to the Hershey Factory in Smith Falls. And after living here for years, we finally made it!

Unfortunately we weren't able to see any chocolate being made, though we did see a few huge drums of melted chocolate being mixed, and the smell was amazingly good. Since our timing was a little off (we saw a woman on the bar moulding machine, just finishing cleaning it up for the day), we plan to head back this summer during a week day.

In the meantime, the shop was open and we brought home a haul of goodies! No cocoa, which I really wanted, but lots of chips, some bulk kisses and a few bars of dark for baking. Oh yes, and 4 types of licorice. We won't be lacking in sugar in this house for awhile!

Since it was such a beautiful spring day, and we were having family time together, that time and enjoyment had to extend to dinner as well. And now that I can walk (squish) into my backyard again, I have been reaquainting myself with my bbq!

So, it seems, is everyone else in the neighbourhood. While at my local Farm Boy for dinner ingredients, one of my regular cashiers (I know many of them, and they know me!) asked why I wasn't bbq'ing like everyone else! Imagine the look of surprise on her face when I answered, "I am - I'm bbq'ing pizza!"

Make your own pizza night - always a popular dinner in my family. While little bit of work for me, prepping all the ingredients, it is one way I can ensure that everyone will eat, since they had a hand in choosing their flavors and toppings. Toppings for these pizza's included:

mozzarella/brick cheese mixture
parm cheese
pepperoni
ham
crumbled medium Italian sausage
tomatoes
red onion
red pepper
broccoli
dried herbs: basil, oregano and crushed chili flakes

I used premade pizza shells, but next time I bbq pizza, I think I'll try making my own dough.

The secret to bbq pizza's isn't very secret - pregrill the top of your crust or you will end up with a soggy pizza. Then flip the crust over, sauce it, top it how you like, and slide it back on the grill, medium heat, close the lid and let the bottom crisp up while the toppings get warm and melt! It will take only minutes for your pizza to be ready.

What a great way to enjoy dinner with my family! And a fun way to make use of my bbq.

Now where did I put those caramel chocolate eggs?