I had been playing around with whether or not I wanted to take part in Canadian Blogging by Post #2: Seasonal Bounty. It sounded fun, but I wasn't sure what I would make, or if I could make something that would provide me with items that could easily be mailed off, especially not items that would break the bank doing so!
Earlier this week I finally made up my mind to participate, so of course I am waiting until the last possible minute to post my recipe entry, and then send it off!
With the theme of Seasonal Bounty in mind, I finally chose to make some apple sauce bread, taking advantage of all the wonderful apples that are available at this time of year. I've made apple sauce bread for my family before - it's something that is nice to make in place of banana bread, and just as simple to make. However, knowing I was going to be doing a "special" blog about this bread, I decided I needed to "kick it up a notch!"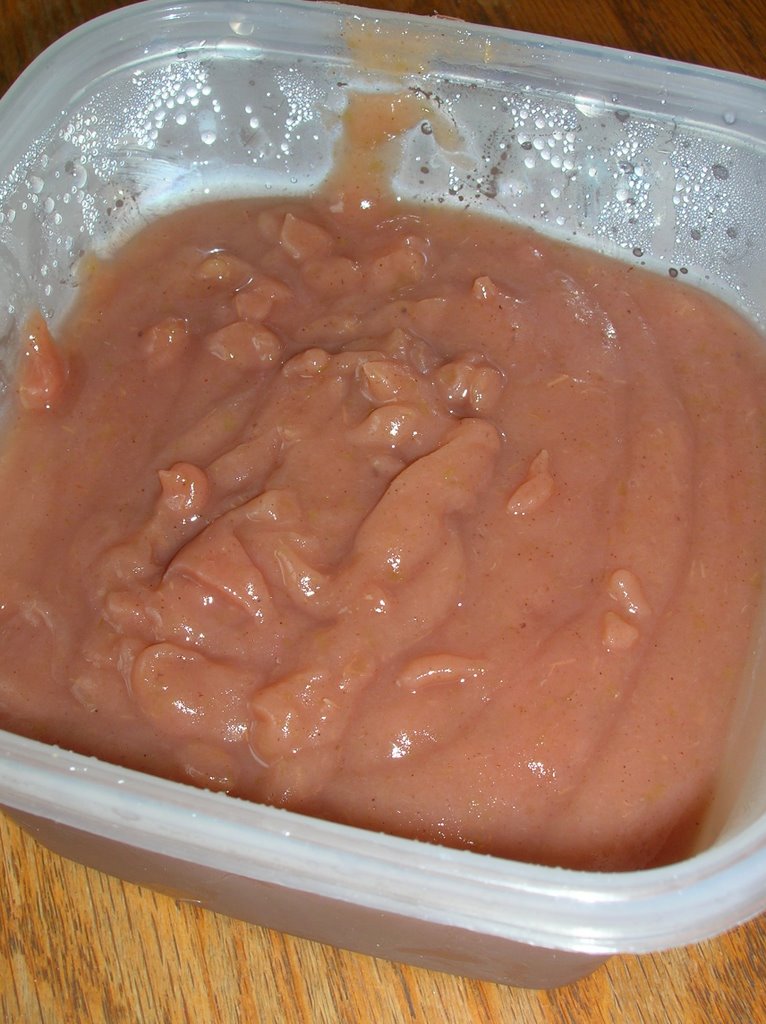 First I decided to make my own apple sauce, which I do every apple picking season, rather than use the convenient jars (which I didn't have, but I also didn't have apples, so had to go shopping either way.) I wanted this apple sauce to be the star of the bread, not the supporter. With that in mind I set out washing and chopping up apples. Not peeling, however. I wanted that pink tinge to the sauce. After cooking down the apples and pureeing them (a hand immersion blender is a handy thing to have), I ran the sauce through a sieve, something I don't normally do. The sauce that came out was smooth and fresh, with the pinkish color I was looking for.
Then I kicked it up some more.
Back to the stove the apple sauce went, with a few additions this time: cinnamon, fresh grated nutmeg, and a touch of cloves. Covered and with low heat, I wanted the consistency of apple butter. Which means patience, something I don't always have alot of. When I was satisfied, the sauce was a darker, thicker apple sauce, with the scents of the spices wafting through my house.
The next notch up involved a bit of an add in - not my families usual favorite of dried cranberries and chocolate chips, but chopped up, dried apples. I felt dried would be better than fresh in this case, hoping they would retain a bit of their shape and texture through the baking, which I didn't think fresh apple chunks would do. I wanted more apple bite in the bread, not just more subtle apple flavor.
Finally I was ready to actually start baking. The batter is easy enough, using the creaming method for butter and sugar. Add in the eggs and vanilla. The usual way to start. This batter had a bit of added milk in addition to the apple sauce, helping to keep the final product moist.
I admit I almost forgot to add in the cinnamon to the batter with the dried ingredients, but caught myself just in time! The last item in was the chopped up apple pieces, mixed in by hand so as not to overwork the batter. I wanted a light textured bread, not a brick! The two loaves baked up brown and tall, again making the house smell all warm and comfortable (a necessity with the head colds in the family this week!) And as hoped, the pieces of apple were visible throughout the loaves, and still had a bit of a bite to them! Horray!
I am very pleased with how this bread came out. The apple flavor is not subtle, nor are the spices, but neither are they overwhelming. This bread is so much tastier than the original version! I may have a hard time going back to it when I need a quick bread for lunches around here!
Now to send this blog off to Jasmine so I can participate in Blogging by Post!
Apple Sauce Bread (From the Pillsbury: The complete book of baking)
This is a variation on the banana bread recipe found in the book
3/4 cup sugar
1/2 cup margaine or butter, softened
2 eggs
1 cup apple sauce (jarred is okay, homemade is better)
1/3 cup milk
1 teaspoon vanilla
2 cups all purpose flour
3/4 teaspoon cinnamon
1 teaspoon baking soda
1/2 teaspoon salt
3/4 - 1 cup chopped up, dried apples
Preheat oven to 350F. Grease bottom only of 9x5 or 8x4 loaf pan (I have no idea what size I have but I always have enough for 2 loaves.) In large bowl, beat sugar and butter until light and fluffy. Bean in eggs. Add applesauce, milk and vanilla. Blend well.
In a small bowl, combine flour, cinnamon, baking soda and salt. Mix well. Add to apple sauce mixture; stir just until ingredients are moistened. Stir in chopped apples.
Pour into greased pans, bake at 350F for 50-60 minutes or until toothpick inserted in center comes out clean. Cool 5 minutes in pan before turning out on wire rack.
Apples sauce (my grandmother used to have this funky funnel that she used for making apple sauce, which I don't have, but you can make it without.)
apples
spash of water
dash of salt
sprinkle of sugar
cinnamon, nutmeg, cloves, optional and to taste
Clean apples and remove core. Cut them into big chunks and put into a heavy bottomed pot. If the apples are very wet, you do not need to add more water. Sprinkle a small pinch of salt on the apples, and a bit of sugar, how much sugar depending on how sweet you like your apple sauce and how sweet your apples are to begin with. If you want, now is the time to add spices. Put the lid on the pot and cook over medium-low heat, coming to check and stir the apples every once in awhile. They are done when all the pieces are soft and broken down - some of the apple flesh itself actually looks like it is foaming. Using an immersion blender (or moving in batches to a regular blender if you don't have an immersion), puree the apples until smooth, skin and all. If you want extra smooth apple sauce, strain the sauce through a sieve to remove the bits of skin that don't puree up fine. Store in an airtight container in the refridgerator for about a week - though it never lasts that long with my children. Can also be frozen.
Seasonal baking
You'll need a few extra napkins with dinner tonight
I didn't plan to make icky, sticky, yummy ribs for dinner last night. I'd actually planned to make steak and double baked potatoes. Until I went into my freezer for steak, saw I had one simmering steak (no idea why one, or why the simmering kind), then saw a package of short ribs underneath it. Spareribs sounded so much better than steak all of a sudden, and didn't require me to bbq in the rain or snow.
I seriously considered making my grandmother's sweet and sour sauce again. Afterall, it is a family favorite that everyone loves, I can make it with my eyes closed, and it is nearly foolproof. With a cold coming on, I wasn't up for anything complicated. But I'd made it recently and wasn't sure if I had any pinapple. Honey garlic was next on my list, mostly because I had a jar of prepared sauce in the pantry. Premade sauce didn't appeal much either, though the honey garlic part still did. So I made my own.
I wanted more control over the ribs than simply making a sauce, pouring it over them and throwing it in the oven, but I didn't want to have to hover. Which is why, I think, I decided to pull out my big electric frying pan with the nice domed lid. I could start the sauce in the pan, add the ribs, and keep an eye on them as they baked with the closed lid, stirring frequently without loosing all the heat.
Honey garlic sauce is fairly easy to make. Equal parts of honey and soya sauce, add in garlic to 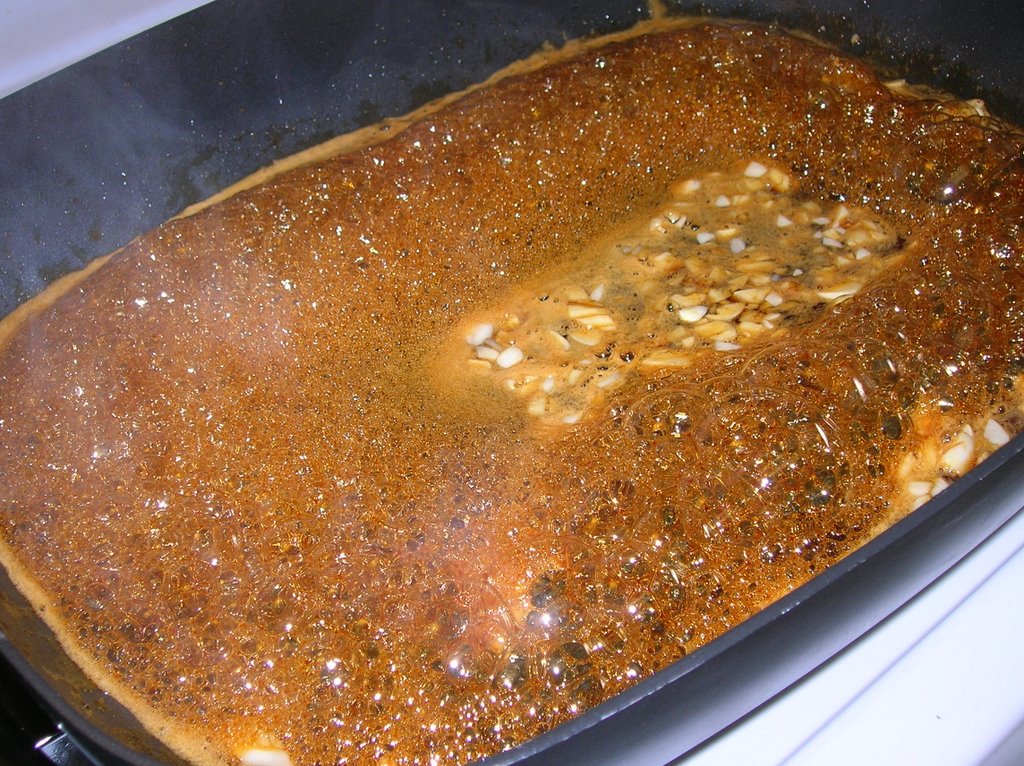 the strength you want, mix it well to make sure the honey is melted into the soy, pour it on whatever you are making. Sometimes I measure. Sometimes I don't. Today was an I don't day. I added a generous amount of honey to the hot pan, then added in the soy and mixed them together, watching them sizzle and foam. The kitchen smelled instantly wonderful. Knowing garlic mellows as it cooks, I wanted lots of garlic going in, and I wanted it in early enough that it would add its flavor into the sauce early in the cooking. The picture on the left is the sauce just as I've thrown in the rough chopped garlic.
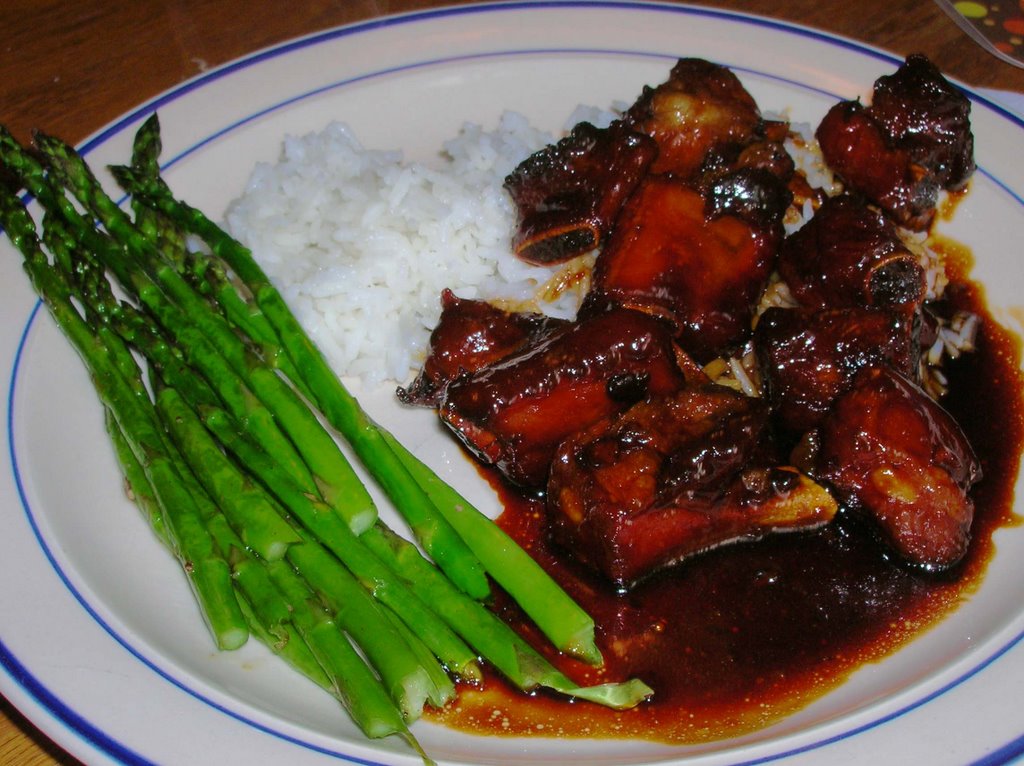
After making sure everything was mixed well, and tasting the sauce just in case I needed to adjust preportions (I did, I needed more honey), I added in the cut up short ribs, made sure they were all coated, turned down the heat and put the lid on. This gave me lots of time to make some rice in the steamer and prepare some asparagus for roasting.
The ribs came out tender, ooey, gooey and very, very good. Clean up was easy as there were no baked on bits of sauce and garlic in a caserole dish, and there were plenty of napkins available when licking sauce off the fingers weren't appropriate.
I bought myself a present!
Can you guess?
Too easy!
An ice cream machine! This has been on my wish list for longer than I had wanted a stand mixer for. This first batch I made, vanilla of course, used the recipe from the book that came with my little toy. I even went out and bought a vanilla bean.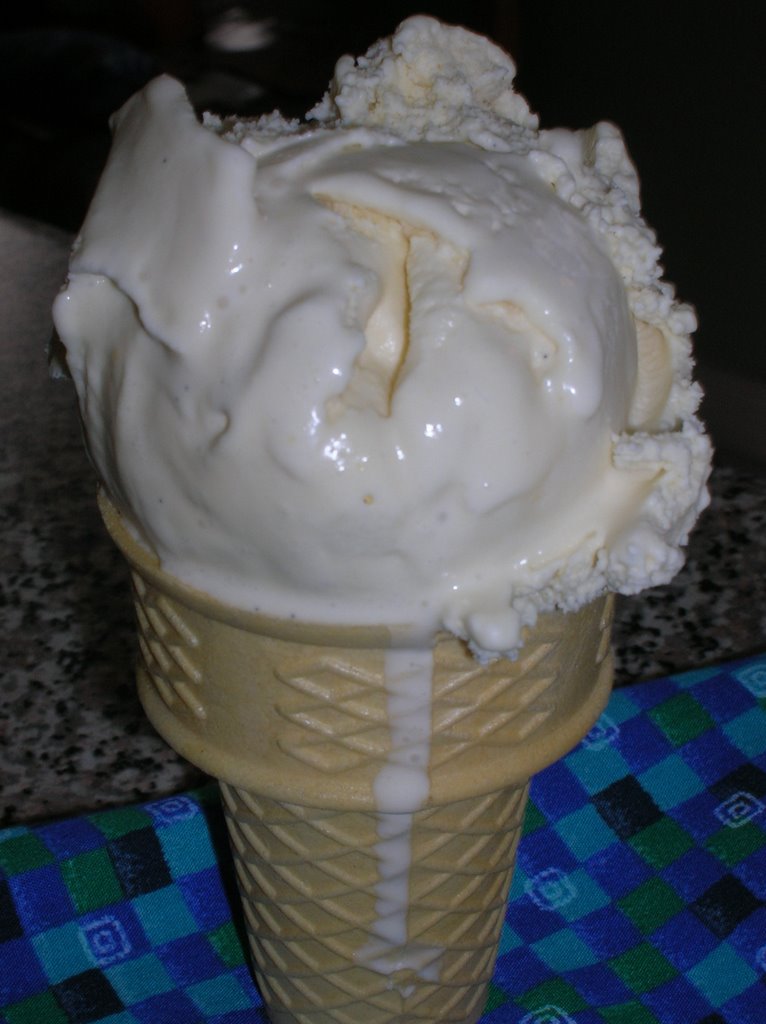 Next batch. I wish I could remember who's blog I got this recipe from. I wrote it down instantly this summer, I think it was featured in a Sugar High Friday, but I can't remember who posted it originally! (So if you know, please comment or PM me so I can link it!)
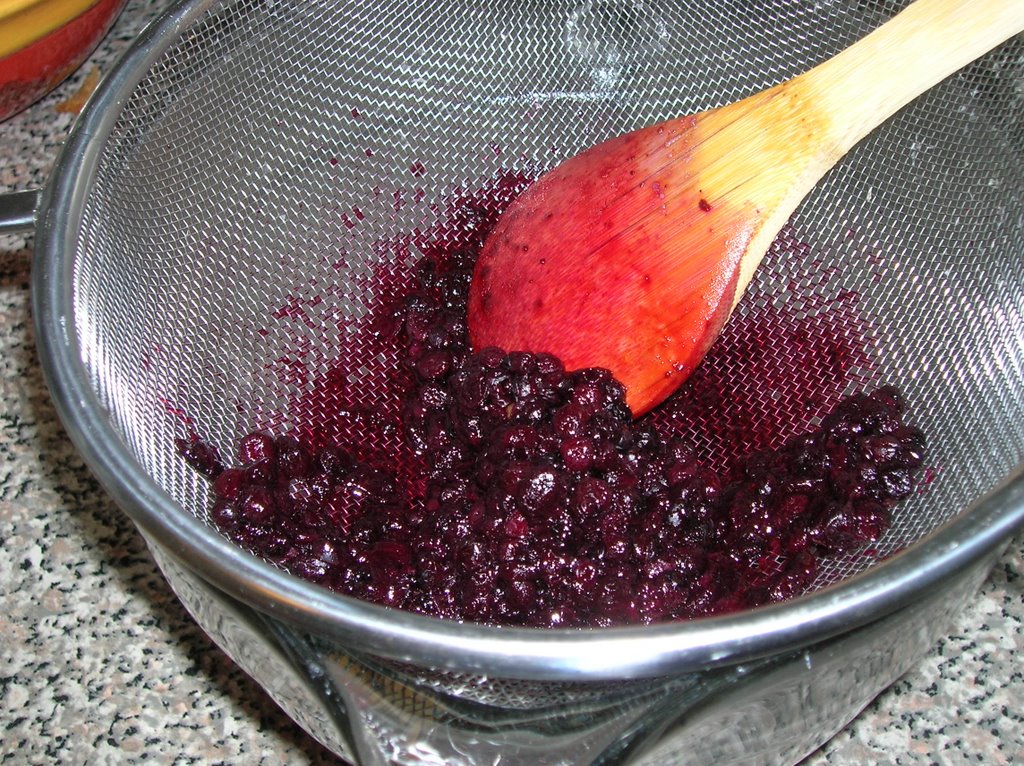
Isn't it a pretty color? And the dark flecks in it are more blueberries, added while the machine was still mixing and churning.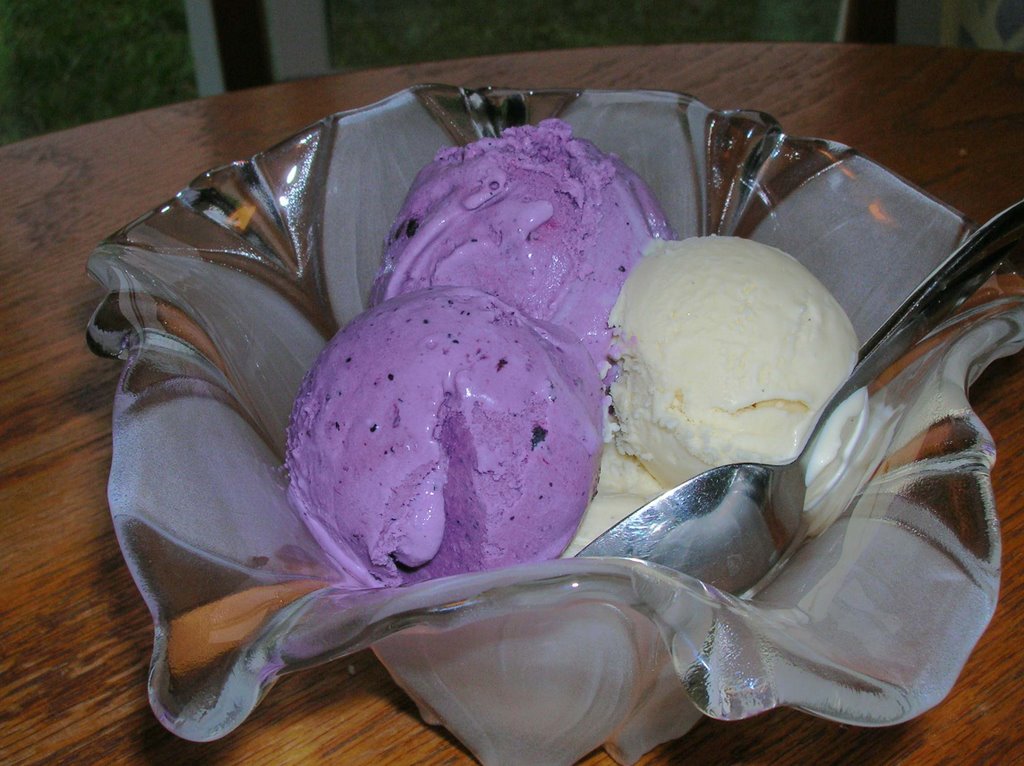 Unfortunately I have a bit of a cold right now, so I had a really hard time with tasting the flavors of both of these. They were both very creamy, and smooth. Even if I hadn't known, I would have been able to say that real cream was used in both of them. In this case it was most of what I could taste, though my husband, the bigger vanilla fan, told me it was great. I'll have the kids try the blueberry later and tell me what they think, and in the meantime I will curse my bad karma that I had to get a cold that mutes my own tastebuds just when I finally get to make homemade ice cream!
On the bright side, at least I will have some nice cold, soothing treats to eat as my throat gets more and more raw from coughing.
Next plan is to try making vanilla frozen yogurt.
Chili Sunday
 It was a chili Sunday, in more ways than one. I had already planned this meal for dinner that night, well before the snow and ice came down earlier in the day. It just seemed like a good family meal to warm up with. And because it included some chips and cheese, one that seemed hopeful the children would also eat. (Cause personally I get tired of spaghetti, even though no one else seems to!)
I saw this recipe watching Rachel Ray's new talk show one day. It was reasonable to make on a weeknight, had a reasonable balance of vegetables and lean meats, and was different from the usual chilli recipes that I see, the kinds that include beans, which my family, including me, won't eat. Those dark chunks you see in the sauce - they aren't kidney beans, they are pieces of sausage!
I did make a few changes. I have never seen Andouille sausage anywhere, so I used a spicy, smoked chirizo instead. I reduced the amount of tabasco from 4 tablespoons to more like 1/2 a teaspoon - I didn't really want my kids running off screaming of heat, but I had also used a spicy sausage, so the two had to balance. And since I have an extreme dislike of green peppers, but like every other kind, I swapped it out for half each of a red and yellow pepper. Beside's, they looked prettier!
I served this with lime flavored tortillas, and some blue corn tortillas, as well as shredded cheddar, the called for green onions, and some sour cream, for when it needed a little mellowing. And a few glasses of milk.
I was happy to sit down to dinner with my family that night. Both children ate the chili, not just the chips and cheese. And both of them enjoyed it. My oldest son, the harder to please child, started his meal with the comments of, "Cool! I get a whole bowl of sauce!" And knowing it was chili and not sauce, he still ate it! It was pretty good for left overs the next day as well.
So does anyone in Ottawa know where I can get some Andouille sausage?
One day in the kitchen
I've had work, or a volunteer obligation, every day this week except Wednesday. My one and only day off.
Turns out it was my day home with my sick child, but as he was content to lay down most of the day, I was able to get into the kitchen and get a bit of my own rest therapy.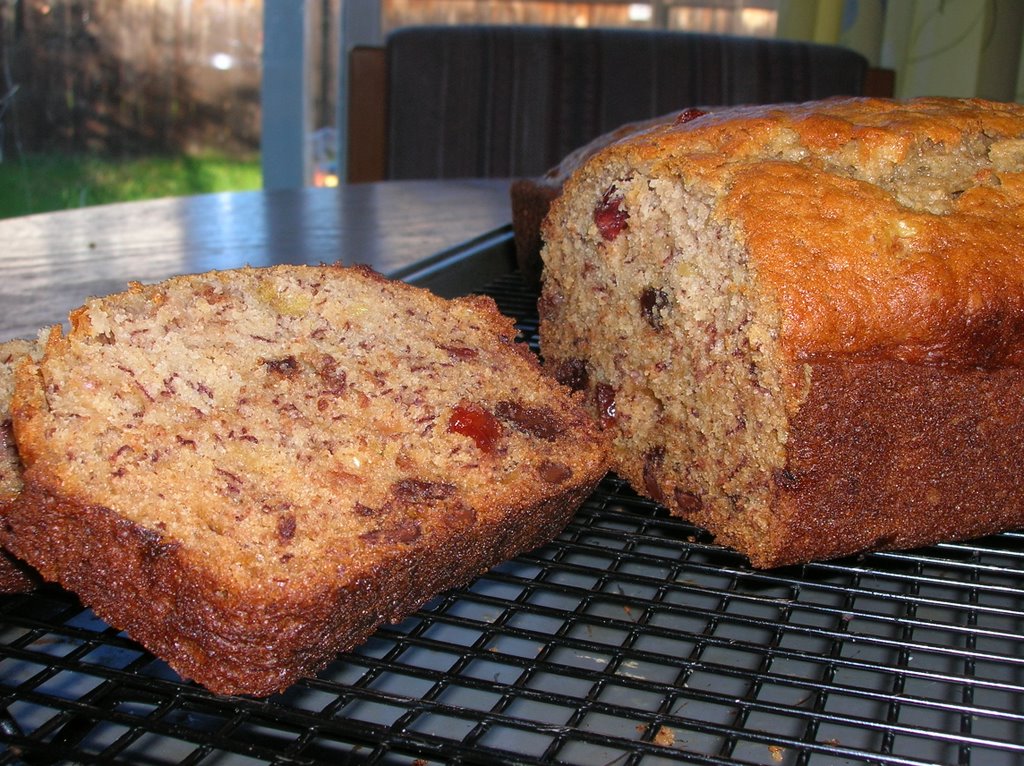 First up on my agenda was banana bread, partially the need to get rid of the 3 over ripe bananas on my counter. Not egg-less banana bread though. With the allergy notifications posted in my oldest son's class, and not an egg allergy among them, I went back to the family favorite banana bread recipe.
Augmented, as usual, with a handful of chocolate chips and dried cranberries.
The two loaves came out of the oven brown, and filling the house with aromas of melted chocolate and warmed banana. Mmmmmm. Even my sick son asked for a piece right away, not after it has cooled, but instantly please!
While this loaf freezes well, it rarely has to be frozen in this house. 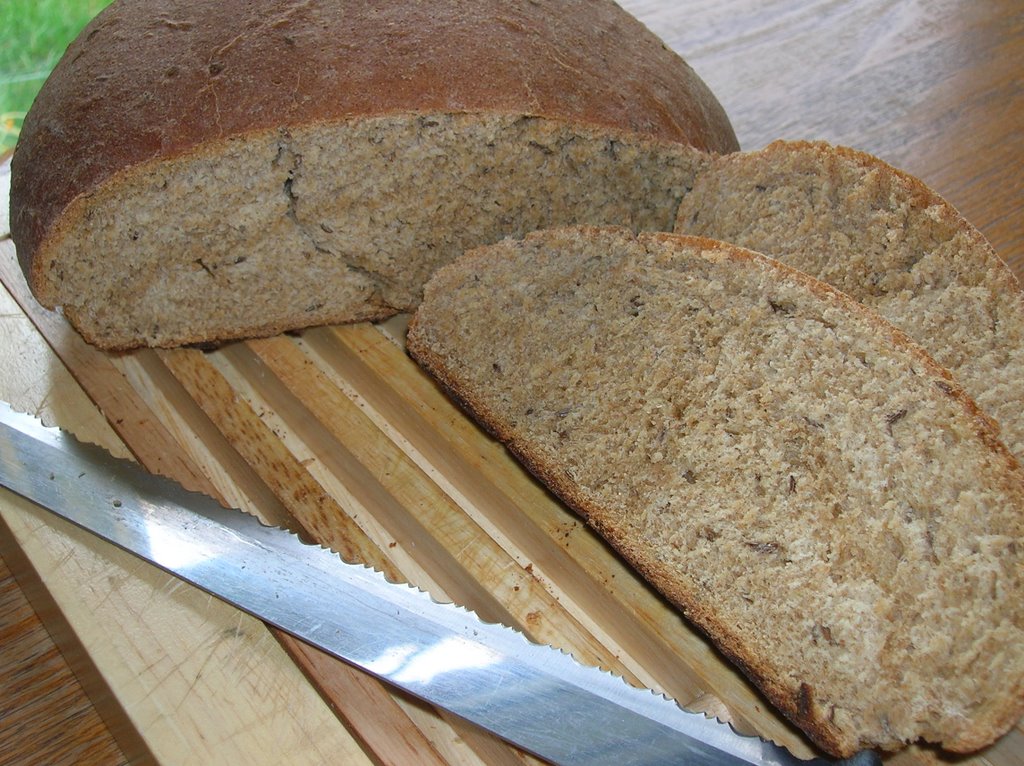 Since I was getting a rare opportunity to do some baking, I also wanted to make some bread for the children's lunches. I had planned to make the honey and oatmeal bread they both seem to like so much, but a quick inventory of my flour supply showed me I didn't have enough flour to make that bread. What I did have, though, was a bag of rye flour, in addition to what was left of my regular flour. Carraway seeds were also on hand, specifically with the plan of one day making some light rye bread.
I had no idea if they children would eat it, but what the heck? Might as well try it.
Like my previous attempts at making bread, I used the recipe that came in the book with my stand mixer. This dough mixed together easily enough, though it came out of the bowl a bit sticky. It rose well and shapped easily into two, roundish loaves. The smell of bread baking wasn't the usual scent, but wasn't unpleasant. Instead it was rather nutty.
The verdict? The children would eat it. At home that is. I packed it into both their lunches the next day and both came home with most of their bread. The husband, on the other hand, seemed to enjoy it. Not only did he have some with his dinner, he had some in his lunch for the next few days. Personally, I preffered the light rye I occassionaly buy at the deli (and I find the honey oatmeal bread too heavy for my liking, so I seem to like making homemade bread, just not eating it much.) And piled high with smoked meat and a light slather of mustard. Course I could buy some smoked meat and try it. Maybe next time. The last thing I made that day didn't involve baking, but dinner. I wanted a dinner that made use of the excess chicken I'd baked for dinner the night before, plus would be good on a cold, icky day. And with a sick child in the house, what better choice than soup?
A quick search of my pantry, in need of some restocking, showed I had some canned corn, diced tomatoes and one container of chicken stock. I also had on hand an avocado, some green onions, cilantro and tortilla chips. Sounds like the fixin's for a Mexican style soup to me?
The basic soup contained some sauteed onions, and white rice. The juices from the canned tomatoes joined in with the chicken stock as part of liquid, as did the juices from the can of corn. I seasoned the soup with a bit of salt and pepper and some cumin, one of my favorite spices.
I diced up the chicken and put it aside on a plate, along with the green onions, avocado and cilantro, shredded up some cheddar cheese, and turned soup night into a soup style bar. Served with a generous side of tortilla chips, these were lime flavored, some cheese melted on top, and my choice of add ins, my family had a healthy and hearty soup to warm on them on a cold day.
And I had some much needed time in the kitchen to relax me on what has been a very long week.
Banana Bread (sorry, no idea where I got this recipe from, it's just the one I've been using for several years)
2 cups flour
1 tsp baking soda
1 tsp baking powder
1 tsp salt
1 cup sugar
1 tsp cinnamon
3-4 ripe, mashed bananas
2 eggs
1 tsp vanilla
1/2 cup vegetable oil
handful each chocolate chips and dried cranberries (optional)
Preheat oven to 350F.
In large bowl, mix together all the dry ingredients until cinnamon is fully incorporated.
In smaller bowl, mix together the bananas, eggs, vanilla and oil. This will not want to mix together but will eventually come together, just be persistant. Add the banana mixture to the flour and mix until no more large lumps of flour are seen. If you want, add in the chocolate chips and cranberries.
Pour mix into two standard size bread pans that have been greased in advance. Bake for 50-60 minutes, checking after 45 if using a larger sized bread pan.
Remove from pans to cool on a wire rack. (Members of this household don't like to wait until the bread is cool before eating - and enjoy it with butter, especially warm with the butter melted into the bread.)
Enjoy!
Birthday treats for my little boy!
 My little boy turned four on Friday the 13th, and was quite excited to be doing so. He'd been counting down the number of "sleeps" until his actual birthday, as well as to his birthday party with his friends, which came the next day.
To help him celebrate his birthday, I baked up some cookies for him to bring to the recreation program that I work at, which he attends with me, before he heads off to school in the afternoon.
Together we made these froggy sugar cookies, baked on a stick for easier eating. I had gone out and purchased a bit of piping equipment so I could pipe icing onto the frogs, the remainder of the butter cream from the previous weekends cake. As I piped the icing around the frogs, and gave them a bit of icing for the eyes, he carefully chose the confetti dots to go on that icing.
This was one of the first times I have every tried using a piping bag for icing, so I was a bit nervous and unsure about how they would turn out. I think for my first time they turned out fairly well, but I will need a larger bag than what I purchased initially. And a few more tips. I hadn't intended to be making frog cookies when I first started this. Initially I was going to make all stars, again on sticks. My star cookie cutter, however, is big. Big enough that one star cookie is about the same as 3 cookies. I did think to test it out, made a few, then decided, oh yes, that cookie would be way to big for these 2, 3 and 4 year olds. They would be perfect, however, in place of a birthday cake that evening, while we were at a friends house for dinner (though she did get him a cake as well, and he ate both cake and cookies, happy as can be.)
These cookies were my second attempt at piping icing, and I was very happy with how they came out. A smaller tip would have allowed for more detail, though there hadn't been one available when I purchased this one. Oh well, reason to go shopping again! All this icing work had been in preperation for the "cupcakes" requested for the party. As I said in a previous post, it had been suggested to me that I not bake cupcakes from scratch with the kids, most of whom were not going to eat much of the cake anyways since they never do at a party.
I had also had the request of a specific type of cake, chocolate with vanilla icing, but knew some kids wouldn't eat that, so I went with a mix of flavors, chocolate with vanilla icing, then with chocolate icing, as well as vanilla with vanilla, then with chocolate. And I put them into ice cream cones to make eating easier.
Learned a bit here. When you are making cupcakes in ice cream cones, underfill them. I think in the end I ended up with about a tablespoon of batter in each cone. On the ones that had more than this, even with my leaving room for expansion, the batter puffed, over flowed, and lent a realistic image of the ice cream having melted down the side of the cone.
Oh. And next time I need to find a better way to carry these out to the party. The tray worked fine when I didn't have to move the cupcakes, but as soon as I did, a bunch went flying. Good thing I had made lots of extra. Though the ones that made it to the party did not look as pretty as the ones I started out with. And again, I had fun piping icing, with the star tip this time.
The kids didn't care that they weren't as pretty, and were happy to have a cupcake that they could hold without getting their hands all dirty. But most importantly, the birthday boy was happy with his birthday party cupcakes, and was proud to hold one in his hand while we all sang happy birthday to him!
Now I think I need a few days break from baking sweets! Or at least birthday treats! Only four months to go before the next child's birthday party!
So apparently I tried to poison my family with dinner last night
No, no one died. Or was even sick. They just didn't like dinner and made lots of faces.
I liked dinner, a roasted red pepper sauce served over bowtie pasta. My youngest child liked the sauce and pasta just fine until he heard both his father and his older brother announce that they didn't like it, then he changed his mind.
I saw this on an episode of Chef at Home that I came accross while channel surfing last week. I liked the look of the vibrant red sauce, tossed with hot pasta and baby spinach and decided I needed a bit of a change from the usual tomato based sauce. Plus according to Michael Smith, his own son didn't know it wasn't tomato sauce until he was told it was peppers. Sounded good to me. I had to omit the baby spinach as no one is selling spinach in any form but frozen right now. So to add some greens into dinner, I served my pasta along side a caesar salad, as well as adding a warmed baguette. Turns out it was a good thing I did.
You'll note from my picture that my sauce did not come out a vibrant red color but orange instead. I don't know why, I roasted 4 very large red peppers along with garlic and onions, a bit of fennel seeds, all tossed in olive oil, then pureed them with a bit of water, but I still ended up with orange. What did he do to make his red?
This sauce did not taste anything like a tomato sauce, so again I don't know how his son didn't know, but was mild, sweetish, and creamy. I couldn't taste the fennel, nor any of the garlic. Actually I couldn't really taste red pepper either. The mild brightness of the sauce, however, was what I needed, a break from the usual tomato based sauces my family likes so much.
So if anyone else makes this (and I wanted to try it with yellow until my family squashed my hopes of a new standby recipe,) let me know if you were able to get the proper color, or if you found it comparable to a tomato sauce.
Thanksgiving pot luck

We went to a friends for their 2nd Annual Pot Luck Thanksgiving dinner on Monday. Normally I would have baked something in advance, but as we were out of town all weekend, I really did not have a chance to bake something that would be portable enough to make the 4 hour trip and still be fresh and tasty. At least not something that the hostess wasn't already providing.
So I made an appetizer, a soft cheese baked with brown sugar, maple syrup and covered with cashews, served with various crackers. Easy to make, easy to bring to a potluck, big on flavor.
Now that's my idea of a good pot luck contribution!
Baking away from home
We were away from home all weekend, up visiting family for Thanksgiving weekend. And because of the timing, the family also had a little birthday celebration for my youngest son, who will be turning four on the 13th of this month.
Afterall, it isn't often we are all together in one location, the 3 siblings, with their children.
(I'm sure this next part will make some people laugh, but most "bloggers" nod in agreement.)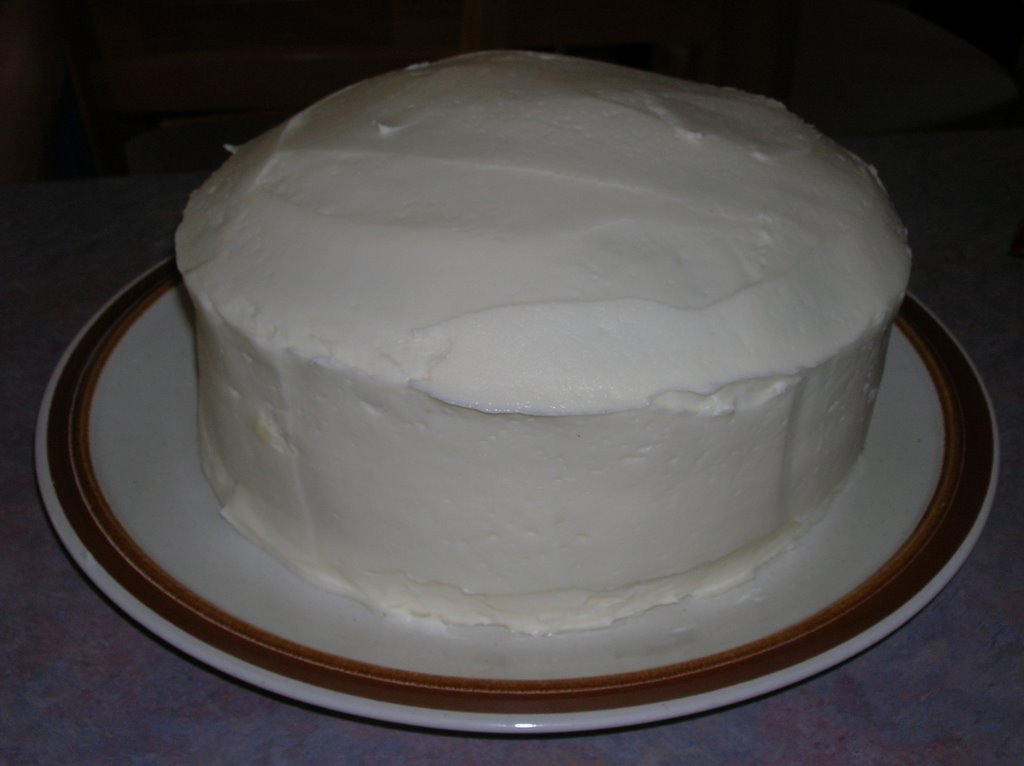
While packing up for the trip, I not only made sure to pack the kids lots of clean clothes, made sure we all had toothbrushes (though mine got helpfully unpacked by a child trying to help Mommy clean up the bathroom.) I also packed my stand mixer, along with some round cake pans, a couple of recipes, and my yeast. If I was going to be doing any baking for my family, I needed my essential tools! (The yeast was for a batch of focaccia bread I made to go with Thanksgiving dinner.)
Saturday morning I was up early, though not as early as usual since my children were visiting their grandparents and getting them up early. I decided to tackle the cake to be part of the thanksgiving/birthday celebration the next night. I had brought with me a recipe for a chocolate cupcake that I had read recently on the Canadian Baker's blog, which I wanted to try in cake form.
First off I should have also brought some cocoa with me as I have no idea how old the cocoa was from my grandmother's cupboard. Using her cocoa, I forged ahead with the recipe. I started out with one batch, poured them into the pans and instantly decided that would not be enough batter for a two layer cake. So I made second batch and got them both in the oven. Oddly, the batches ended up different colors. Since I had put 2/3 of the batter from the first in one pan, then the balance in the other, before I made the second then repeated, I ended up having cake that was two toned chocolate. I don't know if anyone else noticed it, but I certainly did. The next morning I tackled the icing. I had the recipe with me for the chocolate butter cream, but the birthday boy had specified he wanted vanilla icing on his cake (and his cupcakes next weekend too), so I had to wing it. I knew I would need more than the recipe provided, even with adding additional icing sugar to make up for taking out the chocolate. What I ended up doing was creaming a full pound of room temperature butter, then adding in a full 1 kg bag of icing sugar with a bit of milk and some vanilla. Voila, buttercream icing. Way more butter cream icing than I would need for this cake! So I brought the rest home to use later in the week when I am making cupcakes for the birthday party (sorry, there will not be a recipe - the 4 year old has asked for cake mix, and since these little kids are known for not eating much of their cupcakes, I have agreed, which is why I had to have this one as homemade.)
After icing the cake, I put two boys in charge of decorating it: 14 year old uncle and 7 year old brother. Uncle had chose Skittles for the decoration motif and the two of them patterned their way around the edges, added a few on top to go with their pattern, then dotted the sides with the remainder. I added the red icing ribbon and the Happy Birthday on top.
I was disappointed with how dry the cake turned out, figure it was much better as cupcakes, but the children were all quite happy with it, including the birthday boy who frequently eats the icing but little actual cake. Some of the adults added whipped cream to their pieces, but gladly gave up their Skittles to the children. I gave up my Skittles but left the whipped cream for the Thanksgiving pumpkin pie.
Hope everyone had a lovely Thanksgiving weekend!
Family comfort food
 I have been eating this particular meal for as long as I can remember. My grandmother made it, my mother made it, even my husband makes it sometimes. It is warm and comforting, as well as filling.
Sheppard's Pie. Or Pate Chinoix.
I'm always surprised when I see this on restaurant menus, and I scoff at the premade frozen versions you see in the grocery store. First of all, it is fairly easy to make. Second of all, it uses wierd vegetables in it!
I don't know if this is authentic, or just because my grandfather is a corn freak, but I've always had it with creamed corn as the vegetable layer only. (Oh and the grandfather part? It is true - as a child in school, he used to trade away his desserts for other kids bowls of cream corn. If you make it when he is at dinner, make one portion entirely for him and an equal amount for everyone else!)
So for those who don't know how to make it, it really is simple:
Start by putting some potatoes on. You are making mashed potatoes. So if you like yours with the skins, leav'em on! If you don't like the skins, peel'em off! I like lots of potatoes in mine, the non-skinned, really creamy kind.
While the potatoes are cooking, brown up some ground beef. Anywhere between 1 1/3 pound and two, depending on how hungry you are, how many people will be eating it. Got a huge crowd? Brown up enough for two pans.
When the beef is almost done, add in some chopped onion, chopped garlic, a few dashes of Tabasco sauce and a few dashes of Worchestershire sauce. I don't know if my mother or grandmother do that, but we've found we like the added flavor it provides.
Drain the fat out and add the beef to the bottom of an oven proof casseroll dish. I like Corningware.
Top the meat with canned creamed corn, how much depending on the size of your dish and how much beef you have. I like a good layer, solid, covering the beef completly, but not so thick that you are eating creamed corn with a bit of beef. Drop a few spots of butter on that corn, and if you want, add a bit of salt and pepper to the layer.
By now your potatoes should be ready and mashed. So scoop them up and drop them on top of the corn. You want a solid layer, completely covering the corn, but, and this is important, do not push the potatoes down to compact them! Tonight I used one of my cookie scoops to put the potatoes on, then used a fork to smooth them out so there weren't any gaps.
Add a bit more butter to the top of the potatoes, spreading around the little bits so that when they melt they cover as much of the top as possible. Then I like to sprinkle it with paprika, which makes it look pretty and adds a very subtle touch to the flavor.
Bake the entire thing in a 350F oven until the tops looks golden, and you can see bubbles of corn juice trying to break through the sides of the potatoes.
Last really important step. Really important.
Let it sit for about 10 minutes!
Not only does this let it cool down a bit so you don't scorch your mouth, but it also lets the corn juices meld back in so you don't end up with a soggy sheppards pie! (I admit, sometimes my family can't wait and we eat it right away anyways with no complaints.)
This keeps very well as left overs, if there are any, and also freezes fairly well for longer storage.
Happy comfort eating!
Happily back in the kitchen!
 It was a long weekend, away from my family for most of the time, with no time to cook, even if I did end up coming home sooner than expected each day. My husband took care of the meals and the children for the weekend, leaving me free to focus on my first aid training (which I did not find very informative.)
So I was very happy to get back to my family and my kitchen this morning (yes, in that order) and had promised my little guy that he and I would make brownies together this morning. I had been wanting to try out the egg-less brownie recipe I had found at All Recipes, and needing to spend some one on one time with my son was just the reason I needed to make them.
Most substitutions I've read about for eggs involve apple sauce, bananas or gelatin. So I was surprised to see this recipe where the substitution was 1/3 cup of flour, cooked with 1 cup of water until thick. Sound enough principal, so I tried it.
I am not sure I will be trying it again.
The brownies came out alright, the batter was thick and chocolatey (and since it was egg free, the spatula was lickable for my little helper.) When they were cooled, they looked like dense, fudgey brownies. Both my children liked them, which is good since they were for them, but I didn't like them. I found them gummy and lacking in chocolate flavor, despite the 2/3 cup cocoa powder in them. I doubt adding chocolate chips into the batter would have helped much.
However, mission accomplished: one more egg-free treat for the lunch box, and one morning spent with my son.
Next I wanted to tackle making focaccia. I've been reading various recipes everywhere, on alot of blogs, in magazines and books. With my newfound like of making fresh bread, focaccia seemed the next logical step for me. Awhile back I had dog-eared the pages of my Canadian Living magazine so I could easily locate their recipe for focaccia, the simplist of all the recipes I had seen before. Or rather, the plainest.
I did ignore some of their instructions, such as the kneading by hand portion. Afterall, I do own a kick-butt mixer for a reason! And I didn't have either bread flour or coarse salt, so I used all-purpose and kosher.
I have already had a request that this bread be put into tomorrow's lunch box, along with some soup, so that it can be dunked. It was one of the only things my oldest son ate for dinner. And the first thing my youngest son ate as well.
So they must have liked it!
I think next time I would prefer the coarse salt, less salty in flavor and more obvious in texture, plus I would probably like to add a few herbs. It was good bread, I enjoyed it, and I am quite pleased with how it turned out. Now I am ready to be a bit more adventurous with it though.
So bread and dessert provided for, my next plan was for dinner. Actually, I didn't have a plan. Just something that would work with the focaccia, provide some juices for dipping. So I hit the store and wandered, without children, and took my time deciding what to make.
The first thing that sparked my imagination was chicken. That actually happened before I went in the store, carry-over from an episode of Barefoot Contessa that I watched the other day. Think juices from the chicken being mopped up by the slices of focaccia.
Next I spotted carrots. Chicken and carrots, items both of my children like and will usually eat.
Somewhere in there I thought of making orzo as a side, probably sometime after I wandered past the gourmet kitchen of my store where they had a salad made from orzo. I wanted it more simple though, so orzo with butter and cheese, which I wondered if the children would eat. They would if it was any other kind of pasta, so I was hopeful.
Then I ran accross some leeks and decided to try leeks in the orzo. I like leeks and chicken. Though my hopefullness about my children eating it did go down a fair bit. Oh well, I could always put aside some plain for them.
As I was picking up potatoes for tomorrow nights dinner, I spotted the nicest looking brussel sprouts I've seen in awhile, so into a bag they went, and dinner was set!
Then I made a minor change to the menu. All along I had planned to saute my leeks in butter and olive oil, then I figured I'd toss them with the orzo along with the grated parmesan cheese and a bit more butter. I still sauted them, but then I topped my chicken thighs with them and popped the two into the oven, covered in foil. I probably should have taken the foil off sooner, to allow the chicken to brown, but by then I'd gotten busy and forgot. Oh well, so the chicken thighs weren't browned. They were still tasty, and the leeks weren't overly crisp. I like brussel sprouts, but generally I am the only one who eats most of them. My husband will take a few, the children like to break them apart and then say they are full, having never actually tried one (hence I had to make carrots so there was something they would eat.) I wanted them a bit different than the usual cook them, add a bit of butter, grate cheese over them. Again I was remembering a Barefoot Contessa episode. I didn't have pancetta though, so I simply sauted them in butter and olive oil, again, then added a bit of liquid, put the lid on, and let them steam themselves done. It worked, they were different. (And I preferred them the normal way, with my cheese.)
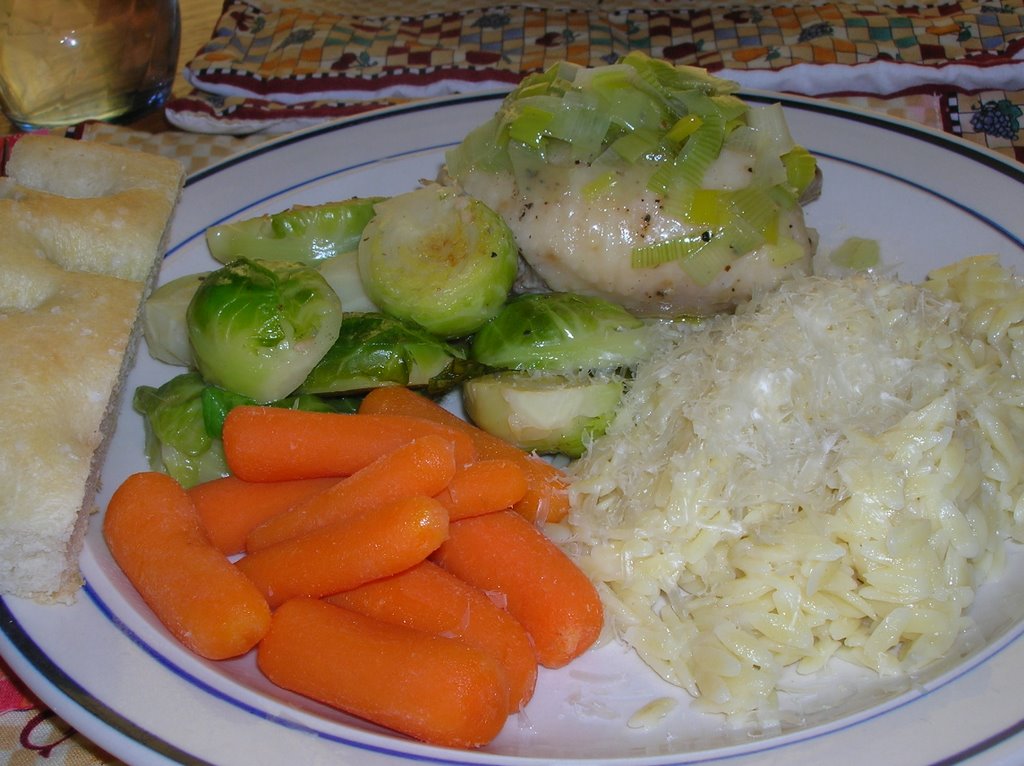 I was fairly satisfied in the end. Balanced, flavorful, fairly healthy. Lots of juices from the chicken to dip the focaccia in. And leftovers for tomorrows adult lunches.
Oh and incidentally, my children both ate their carrots, ignored the brussel sprouts, ate some chicken (which I had taken the leeks off of), and one looked at the orzo, the other took one bite. and both devoured their focaccia, without any dipping.
I'm happy to be back in the kitchen again. (Not so happy about the fussy kids part though.)
No cooking, no updates!
I'm on a two day first aid and cpr course this weekend, a necessity for my new job, so all the cooking responsibility has been handed over to my husband!
He're hoping today won't be too exhausting and I have lots of energy to get back into the kitchen tomorrow. Been wanting to try my hand at making Focacia lately!
Happy eating!
PS: Here is a picture to tide people over - the apples I stuffed and baked off last weekend! (Husband really liked them, he ate his, one son's and half of mine!)